
Post author:
Kristel Sapungan
Site analysis checks site rules, risks, and features before design. Use this simple guide, checklist, and tools to plan smart and avoid delays.
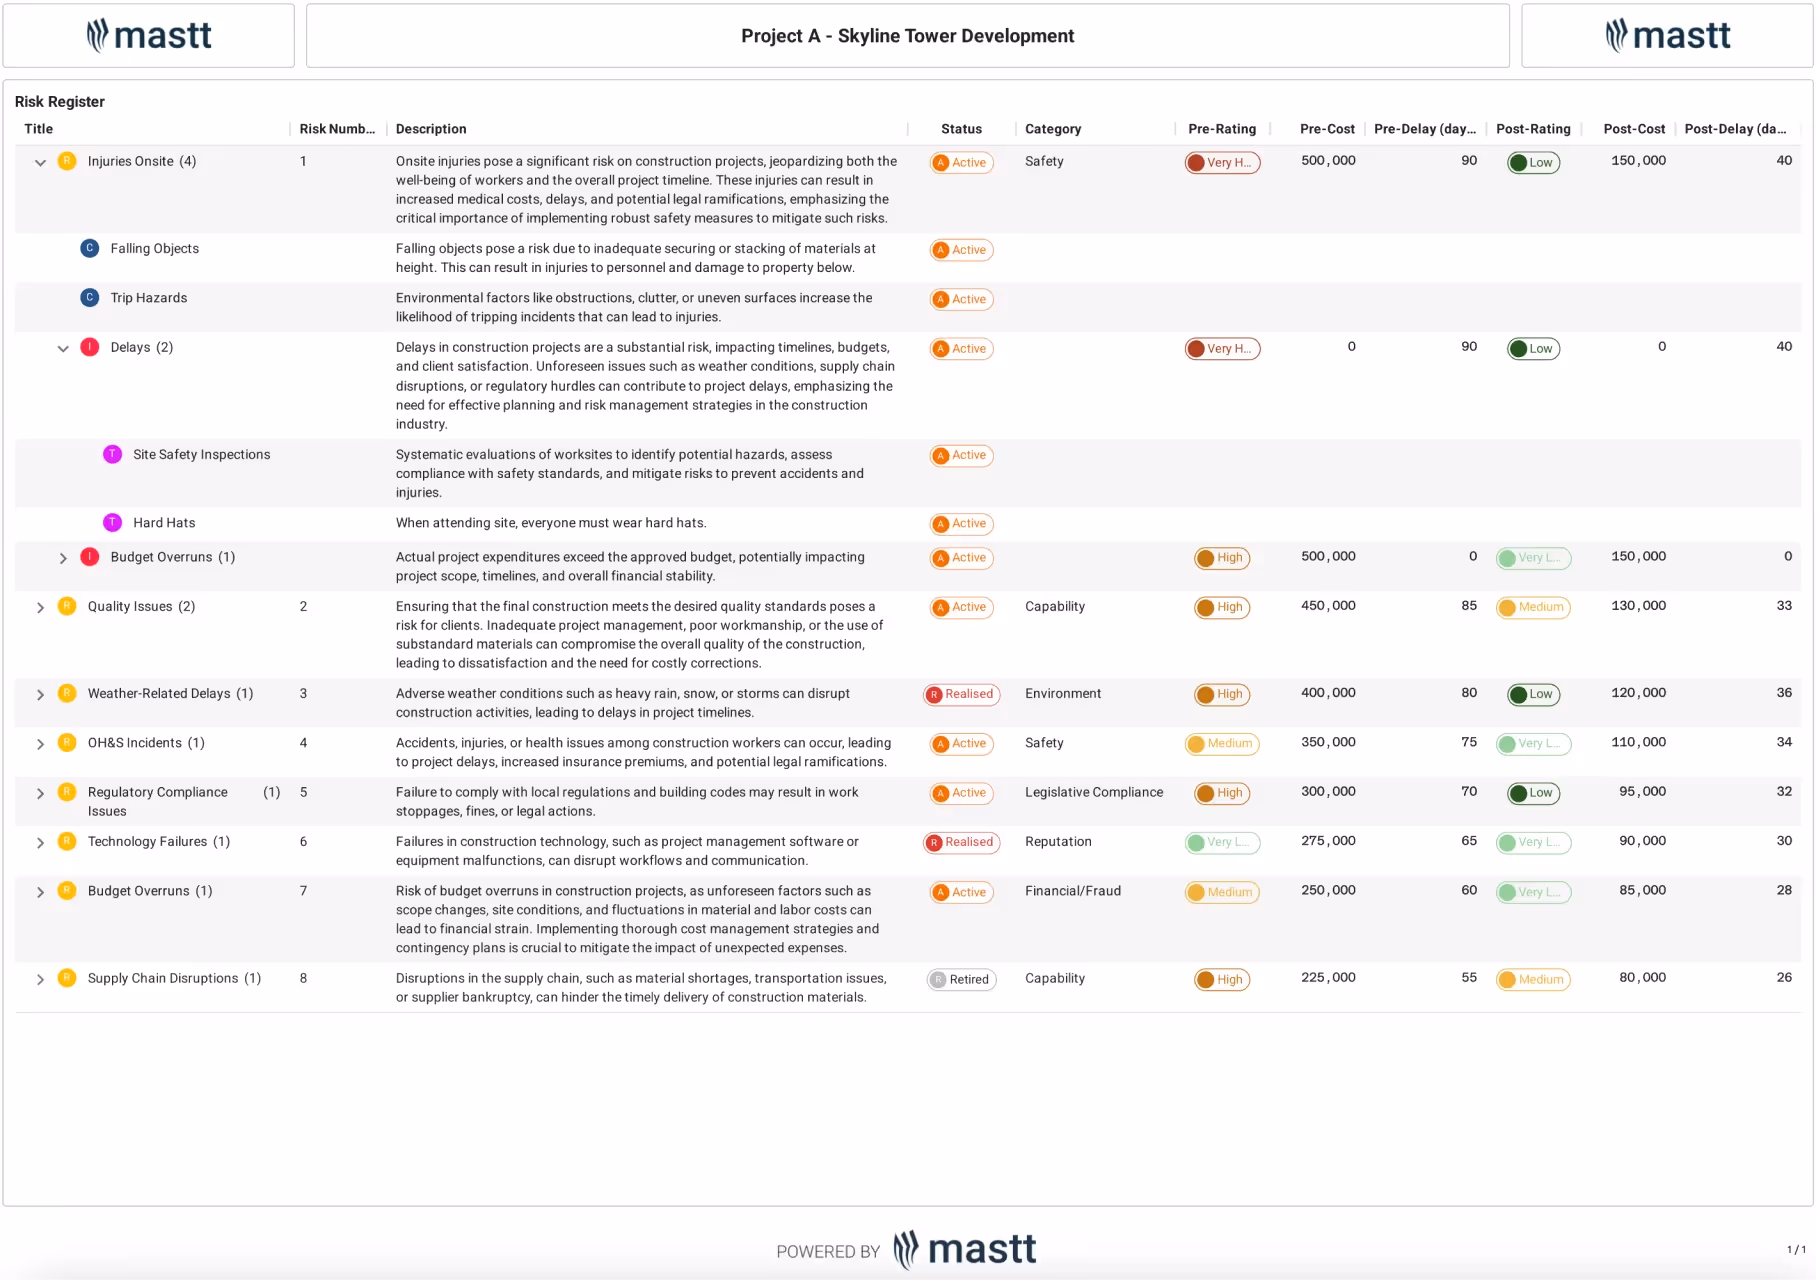
Use this FREE Risk Register Template to identify, assess, and treat risks before they escalate. Reduce delays, track cost impacts, and stay compliant using a proven risk format.

Site analysis is the critical first step in shaping architectural design that works with its environment. It helps architects, project owners, and consultants understand a site’s physical limits, legal information, and environmental context before making informed design decisions.
In this article, you'll get a clear step-by-step guide to the site analysis process, key factors to evaluate, and common challenges to avoid.
A site analysis in architecture is the process of researching and evaluating the site conditions of a specific site location to guide smart, responsive design decisions. It helps architects understand the physical, environmental, legal, and social context of the project site, revealing both its potential and limitations.
An architectural site analysis identifies key factors like access, zoning, sun path and wind patterns, and surrounding context. These insights lay the groundwork for buildings that are practical, sustainable, and suited to their surrounding buildings and landscape architecture.

Site analysis is essential because it uncovers the physical, environmental, and regulatory realities of a site before the design process begins. It ensures every decision is based on thorough site analysis and actual environmental conditions.
Every choice made during this phase either reduces uncertainty or compounds risk. A comprehensive site analysis plays a central role by:
According to research at the University of Applied Sciences Mainz by Bogenstätter, up to 80% of a building’s life-cycle costs are determined during the earliest stages of design. That makes architectural site analysis critical. Poor site evaluation often leads to problems that could have been avoided with better front-end planning.
Site analysis is commonly broken into mega, macro, and micro to help teams understand how an architecture project fits within its broader environmental context and immediate surrounding context. Each type focuses on different layers of information.
These three types work together to shape design decisions at every level:
Construction projects skipping one of these layers often run into missed constraints or missed opportunities.
For example, a commercial construction might check every box at the micro level but fail at the macro if foot traffic patterns are low. Good architecture site analysis connects all three scales to guide design that fits both its site and its surroundings.
Project managers and owners use site analysis to understand the physical, legal, and environmental realities of a location before committing to design or construction. This process supports smarter decision-making by exposing risks, unlocking opportunities, and grounding every move in real-world context.
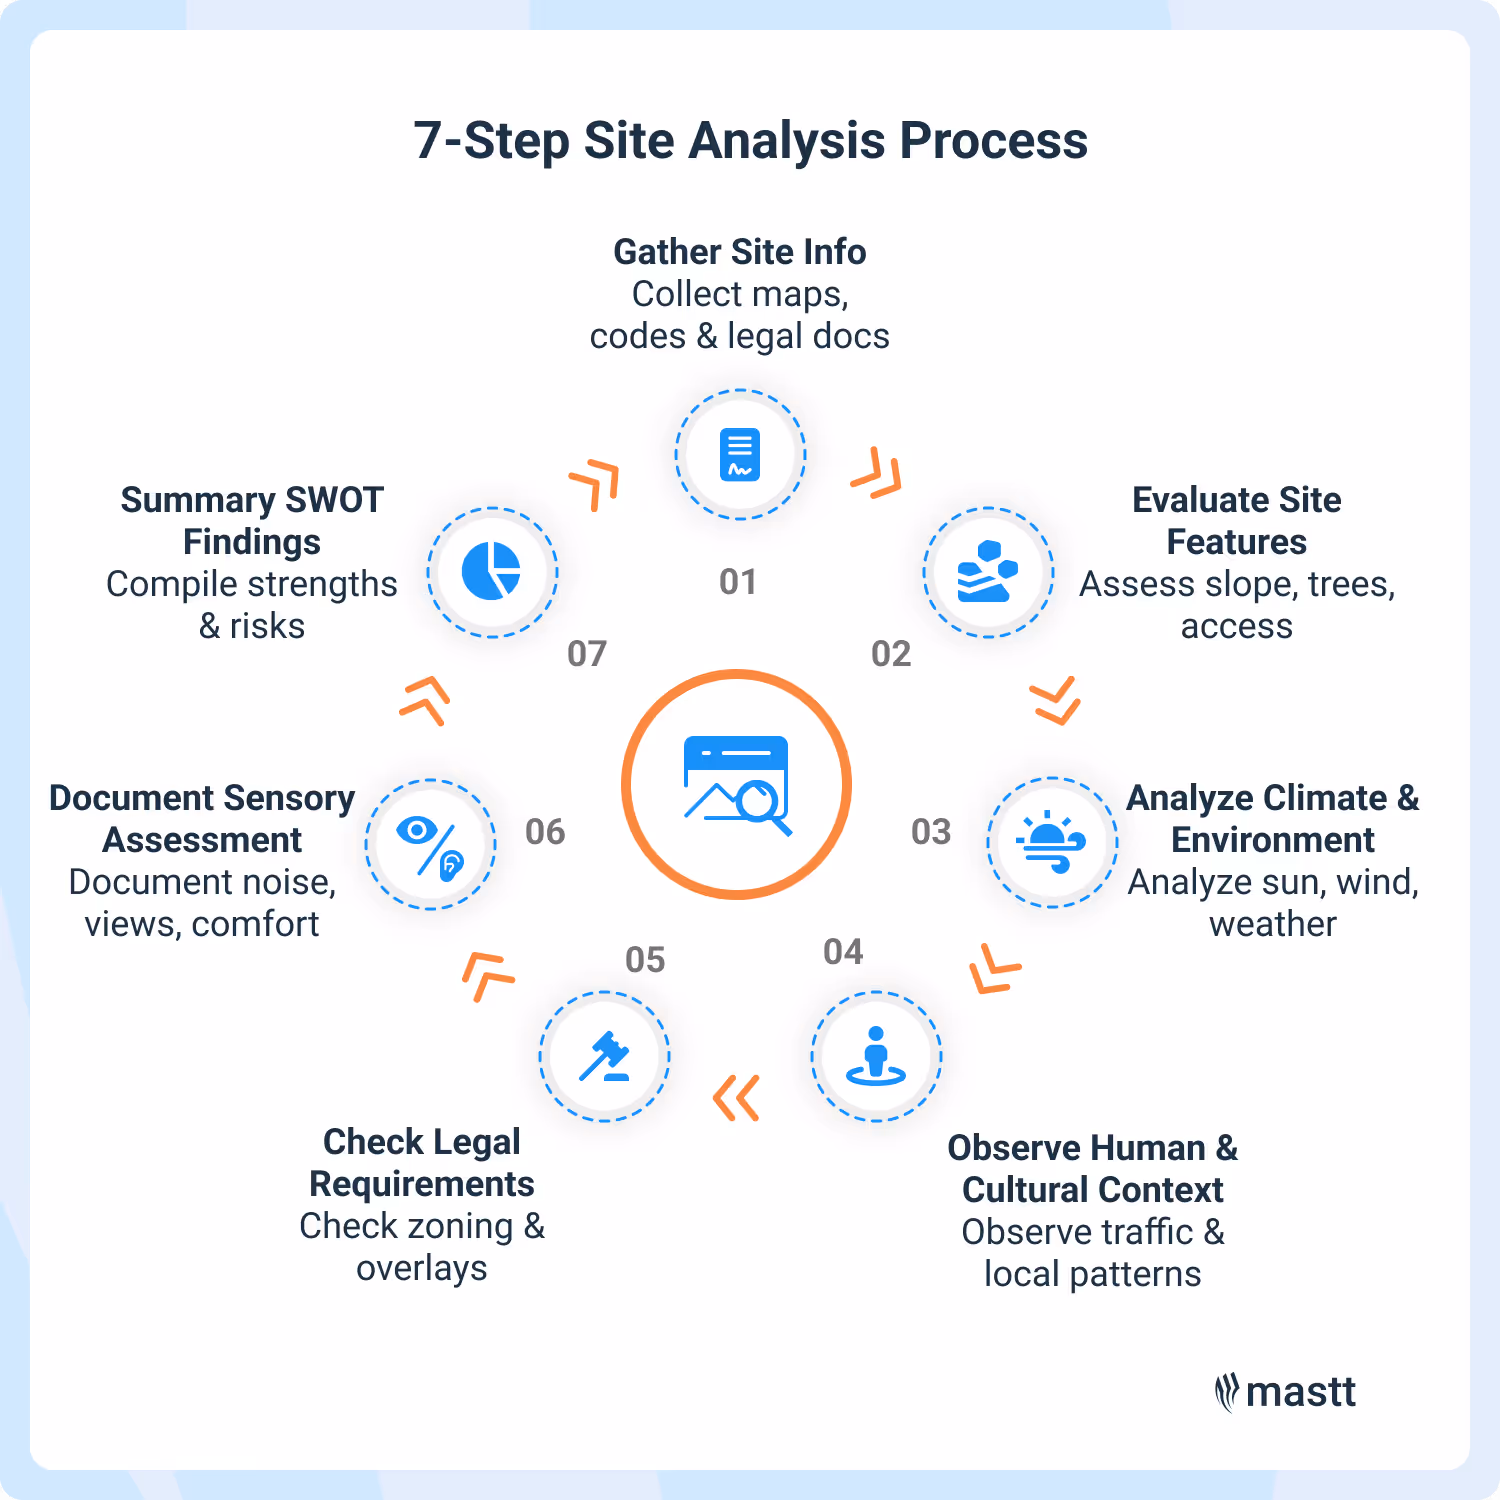
Before visiting the site, collect all available background data. Use GIS (geographic information system) tools or Google Maps to locate property boundaries and surroundings. Pull zoning maps, planning overlays, and public land records to confirm legal use, ownership, and lot dimensions.
Early research helps eliminate assumption. Knowing the zoning classification, allowable height, or easements in advance saves time and avoids early-stage design conflicts.
💡 Tip: Keep a folder with PDFs of local codes, land titles, and planning ordinances.
Visit the site to document slope, access points, utilities, trees, and any visible water features. Schedule a professional survey if slope, setbacks, or lot dimensions are unclear. Arrange soil testing to assess stability and drainage.
These details influence building orientation, foundation type, and landscape construction. Missed topography or poor soils can trigger costly redesigns or project delays.
💡 Tip: Take photos from each site edge facing inward. It helps when reviewing access, grading, or privacy concerns later.
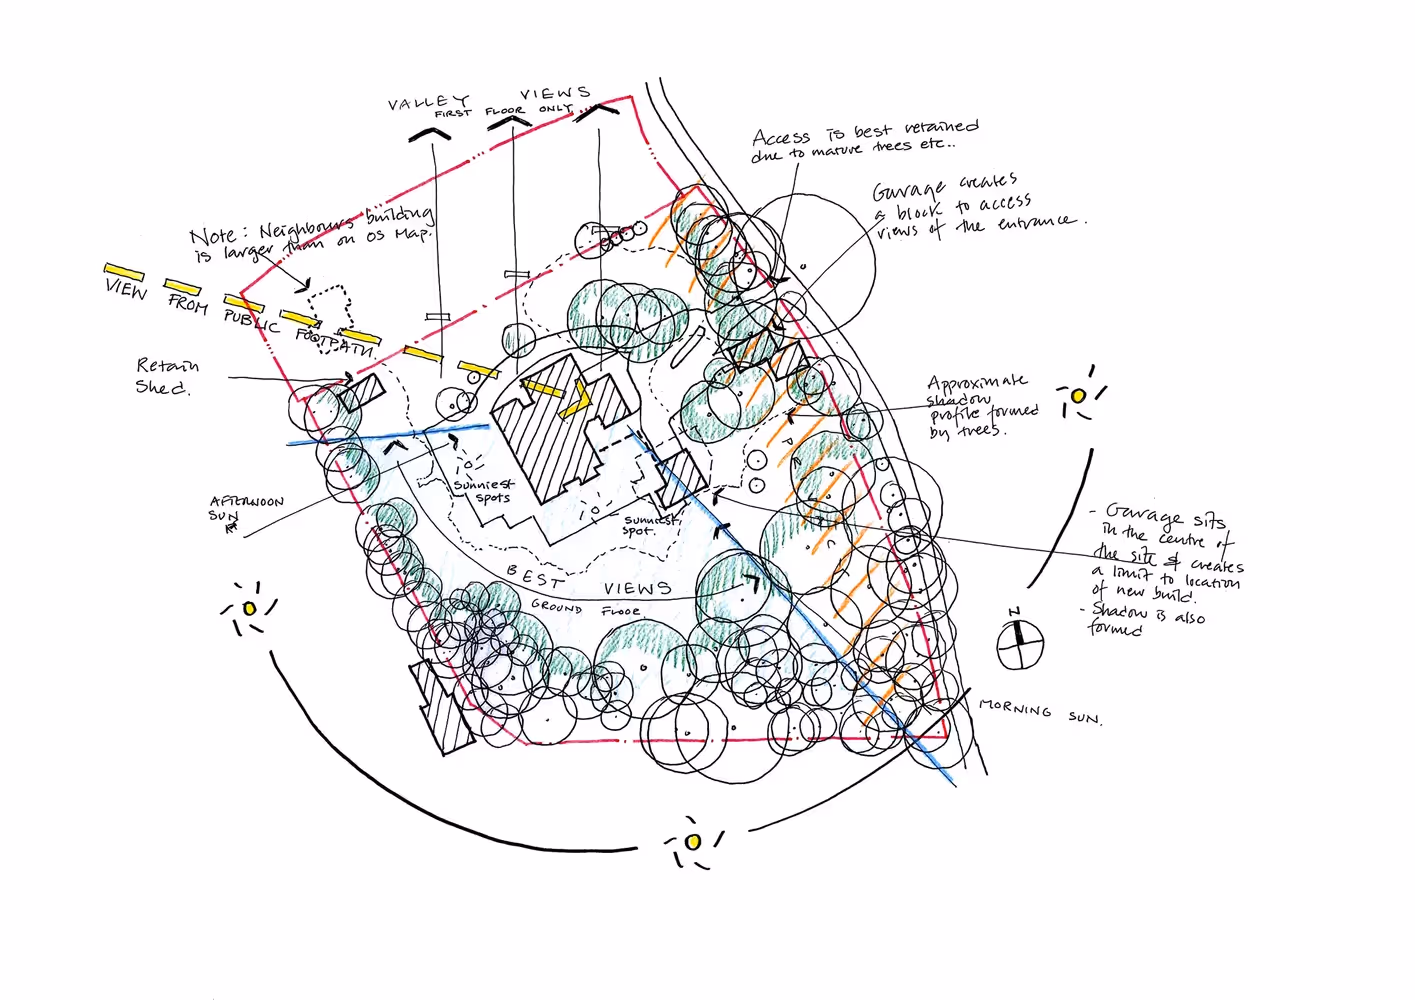
Study how sun, wind, temperature, and rainfall interact with the site. Use sun-path diagrams to track shadows year-round. Pull wind data and temperature extremes from NOAA or local weather stations. Check FEMA flood zones and stormwater history.
This data guides passive design, energy use strategies, and siting decisions. For example, placing main glazing out of direct western sun may improve comfort and reduce HVAC load.
💡 Tip: Use free tools like SketchUp or SunCalc to simulate sun angles on your site throughout the year.
Look beyond the physical and observe how the site fits into the neighborhood. Document nearby buildings, road types, and pedestrian activity. Interview local contacts to learn about community patterns, traffic flows, or business history.
Understanding local context helps shape access points, scale, hours of operation, and design tone. A site near a school, for example, may demand specific noise controls or traffic flow planning.
💡 Tip: Visit at multiple times. It reveals traffic rhythms and how the space changes over time.
Confirm zoning classification, allowable uses, floor area ratio, and building height from local planning offices. Identify any overlays like heritage, conservation, floodplain that may restrict development. Verify easements, rights-of-way, and setbacks.
Ignoring this step risks wasted design hours and rejected permits. Stay aligned with what’s legally buildable.
💡 Tip: Ask planning staff if any recent amendments or discretionary permits apply to the property. These can offer unexpected options or restrictions.
Photograph key views into and out of the site. Use a sound meter app to log ambient noise from traffic, HVAC units, or neighboring sites. Note areas of heavy glare, deep shade, or strong wind exposure.
These sensory factors shape both comfort and experience. For restaurant construction, this can influence seating layouts, signage placement, or outdoor space usability.
💡 Tip: Pause in each major zone of the site and write down what you see, hear, and feel. This helps design with experience in mind.
Summarize the findings into a visual matrix of strengths, weaknesses, opportunities, and threats. Use it to highlight where the site supports or challenges your project goals. Prioritize items that impact cost, timeline, or design viability.
This is the bridge between analysis and action. It helps you communicate clearly with stakeholders and shape a design brief that reflects the site’s reality.
💡 Tip: Create a one-page infographic of your SWOT matrix and key site visuals. It’s a powerful tool for aligning early-stage teams.

Architectural site analysis is a collaborative effort led by architects and supported by technical experts and client-side representatives. The key roles typically include the architect, project manager or owner’s representative, and consultants.
Each contributes a specific perspective that shapes the accuracy and usefulness of the analysis. The most directly responsible roles are:
Other contributors may include traffic consultants, heritage advisors, landscape architects, or community liaisons. Each role fills a gap others can’t see alone. The earlier these voices join a comprehensive site analysis, the fewer surprises arise.
Site analysis depends on the right mix of site visit observations, desktop study, and digital tools to surface key insights. Effective approaches combine geographic information system (GIS) mapping, environmental data, and direct fieldwork.
To streamline the process and boost accuracy, project teams use:
Never rely on just one tool or source. Combine digital maps and models with an on-site visit. Store your findings centrally so the team can access them quickly throughout all design phases.
Fisher Pavilion in Seattle demonstrates how thorough architectural site analysis leads to better design and measurable project success. The team’s approach focused on preserving green space, integrating landscape architecture, and addressing climate and community needs.
Here’s how the Fisher Pavilion team applied site analysis to inform design decisions:
When site analysis is done well, project performance improves. Fisher Pavilion achieved a 20% energy reduction, better comfort, and a 16% increase in green space, proving strong upfront site analysis yields better outcomes.

Most site analysis issues stem from missed details, late research, or delayed specialist involvement, resulting in costly rework or delays. Common pitfalls and their solutions include:
⚠️ Relying on outdated maps or satellite images
Old records and maps miss critical changes like utilities or site alterations, leading to surprises during construction.
✅ Solution: Combine recent aerial imagery with a thorough site visit. Confirm boundaries and update your data before finalizing plans.
⚠️ Skipping early zoning and overlays review
Delaying checks on zoning, overlays, or heritage controls until design starts forces last-minute adjustments.
✅ Solution: Request zoning confirmation early, documenting overlays and restrictions before starting the design.
⚠️ Missing utility or soil issues until late
Hidden infrastructure or unstable soils overlooked early can devastate budgets.
✅ Solution: Conduct soil tests and underground scans during initial feasibility. Share results early to address risks promptly.
⚠️ Not consulting neighbors or stakeholders
Ignoring community input can result in pushback or additional requirements after design submission.
✅ Solution: Engage community stakeholders early to understand concerns and local conditions influencing your design.
⚠️ Overlooking microclimate and comfort factors
Ignoring sun, wind, or noise patterns can lead to uncomfortable, inefficient designs.
✅ Solution: Analyze sun paths, shadow patterns, and wind conditions to position elements for optimal comfort and efficiency.
Regularly reviewing assumptions throughout the process ensures your site analysis informs initial design, stakeholder discussions, and long-term planning.
Use this practical checklist to evaluate your site before design begins. It helps ensure no critical detail gets missed across physical, legal, and contextual factors.
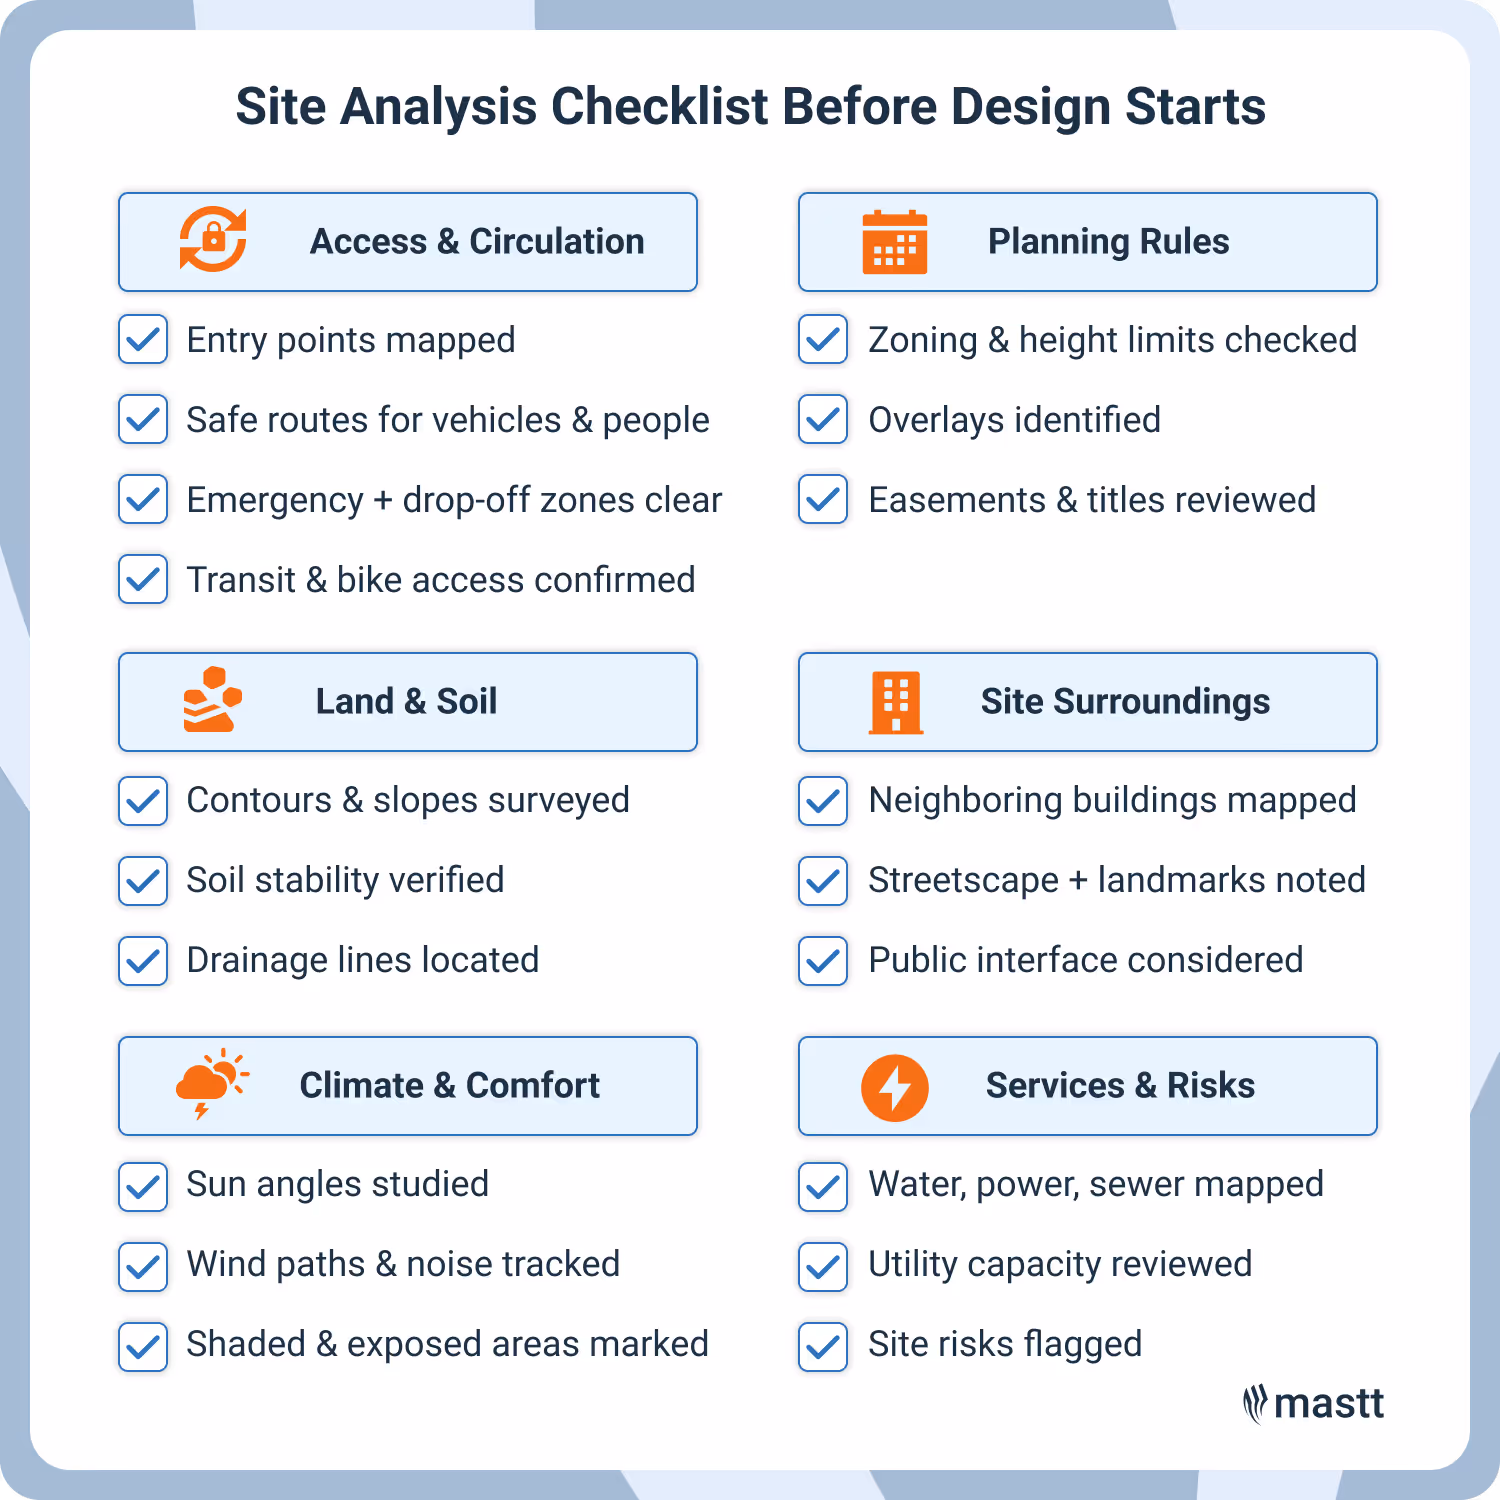
Access and Circulation
Confirm how people and vehicles will move through the site and connect with the area around it. Check off these access-related factors before locking in any layout:
✅ Safe pedestrian and vehicle routes planned
✅ Drop-off zones and emergency access marked
✅ Transit, bike, and sidewalk connections confirmed
Topography and Soil Conditions
Survey and test land conditions to understand what can be built and where. Focus on these terrain-related checks to avoid structural surprises later:
✅ Slopes and contours accurately mapped
✅ Soil stability, moisture, and contamination tested
✅ Drainage and stormwater paths identified
Climate and Microclimate
Document environmental conditions to inform layout, orientation, and comfort. Use the list below to guide your site’s environmental review:
✅ Sun paths and seasonal shading charted
✅ Wind exposure and noise levels recorded
✅ Key views, shade areas, and heat pockets noted
Zoning and Legal Constraints
Verify all planning rules and restrictions to avoid approval issues later. Don’t move forward without ticking off these compliance items:
✅ Zoning type, height, and FSR confirmed
✅ Heritage, flood, or bushfire overlays checked
✅ Easements, titles, and right-of-way reviewed
Neighborhood and Built Context
Assess how the site fits within its street, block, and neighborhood character. Use these prompts to help align your design with its surroundings:
✅ Local architecture and streetscape documented
✅ Nearby landmarks and gathering points mapped
✅ Public realm and community interface considered
Infrastructure and Services
Check what service connections exist and what upgrades might be needed. Confirm these utility-related points before advancing to design:
✅ Locations of water, sewer, power, and stormwater noted
✅ Utility capacity and condition verified
✅ Approval timelines for utility work understood
Environmental and Risk Factors
Identify red flags early to prevent costly remediation or delays. Make sure these potential risks are addressed from day one:
✅ Flood risk, erosion, or bushfire exposure reviewed
✅ Nearby pollution sources or hazards identified
✅ Soil tested for contaminants or hazardous materials

Mastt supports site analysis by giving project teams a centralized, real-time view of early project risks and requirements. For project owners and consultants, it becomes a central platform for aligning decisions before design begins.
Here’s how Mastt adds value during site analysis:
💡 Tip: Use Mastt to standardize your early-phase reporting across all projects. That way, your team never starts design with blind spots.

Site analysis forms the foundation of every smart, buildable, and context-aware architectural project. Understanding physical, environmental, legal, and community conditions early allows teams to avoid costly mistakes and shape designs truly suited to their surroundings. This approach ensures smoother approvals, fewer delays, and buildings that perform better over time.
Written by
Kristel Sapungan is a licensed architect and Content Writer at Mastt, combining her technical background with expertise in SEO and digital strategy. With experience in architectural design, construction documentation, and on-site coordination, she delivers precise, high-quality content for the construction and capital works sector. Her work enhances industry communication by translating complex concepts into clear, professional narratives.


Contributions from

Cut the stress of showing up unprepared
Start for FreeTrusted by the bold, the brave, and the brilliant to deliver the future