


To do a change order in construction, you need a clear process. It should cover what’s changing, why it’s changing, and make sure everyone agrees before any work starts.
Skipping steps or relying on verbal agreements leads to confusion, delays, and budget blowouts. Here’s how to do a change order properly, so you can manage changes with confidence and keep your project on track.
Step 1: Document the Need for Change
Start by identifying exactly why the change is needed. The trigger could come from:
- A design conflict in the construction drawings
- A client request during construction
- An RFI response that alters the original plan
- A site condition that differs from expectations (e.g. buried utilities, poor soil)
- A proposal from the contractor or a specialist subcontractor
As soon as the issue is identified, write it down. Don’t wait. Delayed documentation increases the risk of confusion and missed details. Be specific and include:
- A short, clear description of the issue or requested change
- The exact location of the change (e.g. “north stairwell, Level 2”)
- The date and time the issue was first identified
- The names and roles of all people involved in identifying or raising it
If available, include supporting evidence. Add photos, marked-up drawings, RFI responses, or email records if you have them. This becomes your official record and gives context for anyone reviewing the change order later.
Step 2: Notify Relevant Stakeholders
Once the need for a change is documented, let the right people know quickly and clearly. Don’t wait for the next meeting or rely on someone to pass the message along. Direct communication prevents delays and keeps everyone aligned.
Notify both internal and external stakeholders, such as:
- The project owner or client
- Design consultants (e.g. architect, engineer)
- Your internal project manager and site team
- Affected subcontractors or suppliers
Be formal and specific. Use email or construction management software to send a clear summary of what’s changing and why. Verbal updates on site can lead to misunderstandings or missed steps.
Include a brief description of the issue, what action may be required, and any immediate impacts you’ve identified.
Step 3: Assess Scope, Time, and Cost Impacts
Before you draft the change order, figure out how the change affects the project. This step is about understanding the full ripple effect.
Start by confirming whether the change adds to, removes from, or modifies the original project scope. Then check how it will impact the project timeline. Will it delay milestones, affect sequencing, or require rework? Finally, estimate the cost. Look at both direct and indirect impacts.
You might need input from:
- A cost estimator to break down labor, materials, and equipment
- A planner or scheduler to update timelines
- Site supervisors to flag potential disruptions
Don’t forget indirect costs. Even a small design tweak could lead to material waste, lost productivity, or re-coordination with other trades. If access or safety is affected, there could be compliance implications too.
To double-check your estimates, use a reliable construction cost calculator before finalizing the change. The goal here is to understand the change fully, so there are no surprises during execution or invoicing.

Step 4: Prepare the Change Order Documentation
Once you’ve assessed the impacts, it’s time to put everything into a clear, formal document. This is what gets reviewed, approved, and ultimately becomes part of the construction contract.
Start with a short, specific description of the change. Explain what’s being added, removed, or modified. Reference the original drawing, specification, or contract clause that the change affects. If possible, include updated drawings, sketches, or schedules that show the revision clearly.
You also need to include:
- A cost breakdown structure: list labor, materials, equipment, and any subcontractor quotes. Be transparent about how the numbers were calculated.
- A time impact: state how many days are added or removed, and how this affects the overall timeline or milestone dates.
- Supporting documentation: attach anything relevant, including consultant comments, supplier quotes, internal estimates, RFIs, or field notes.
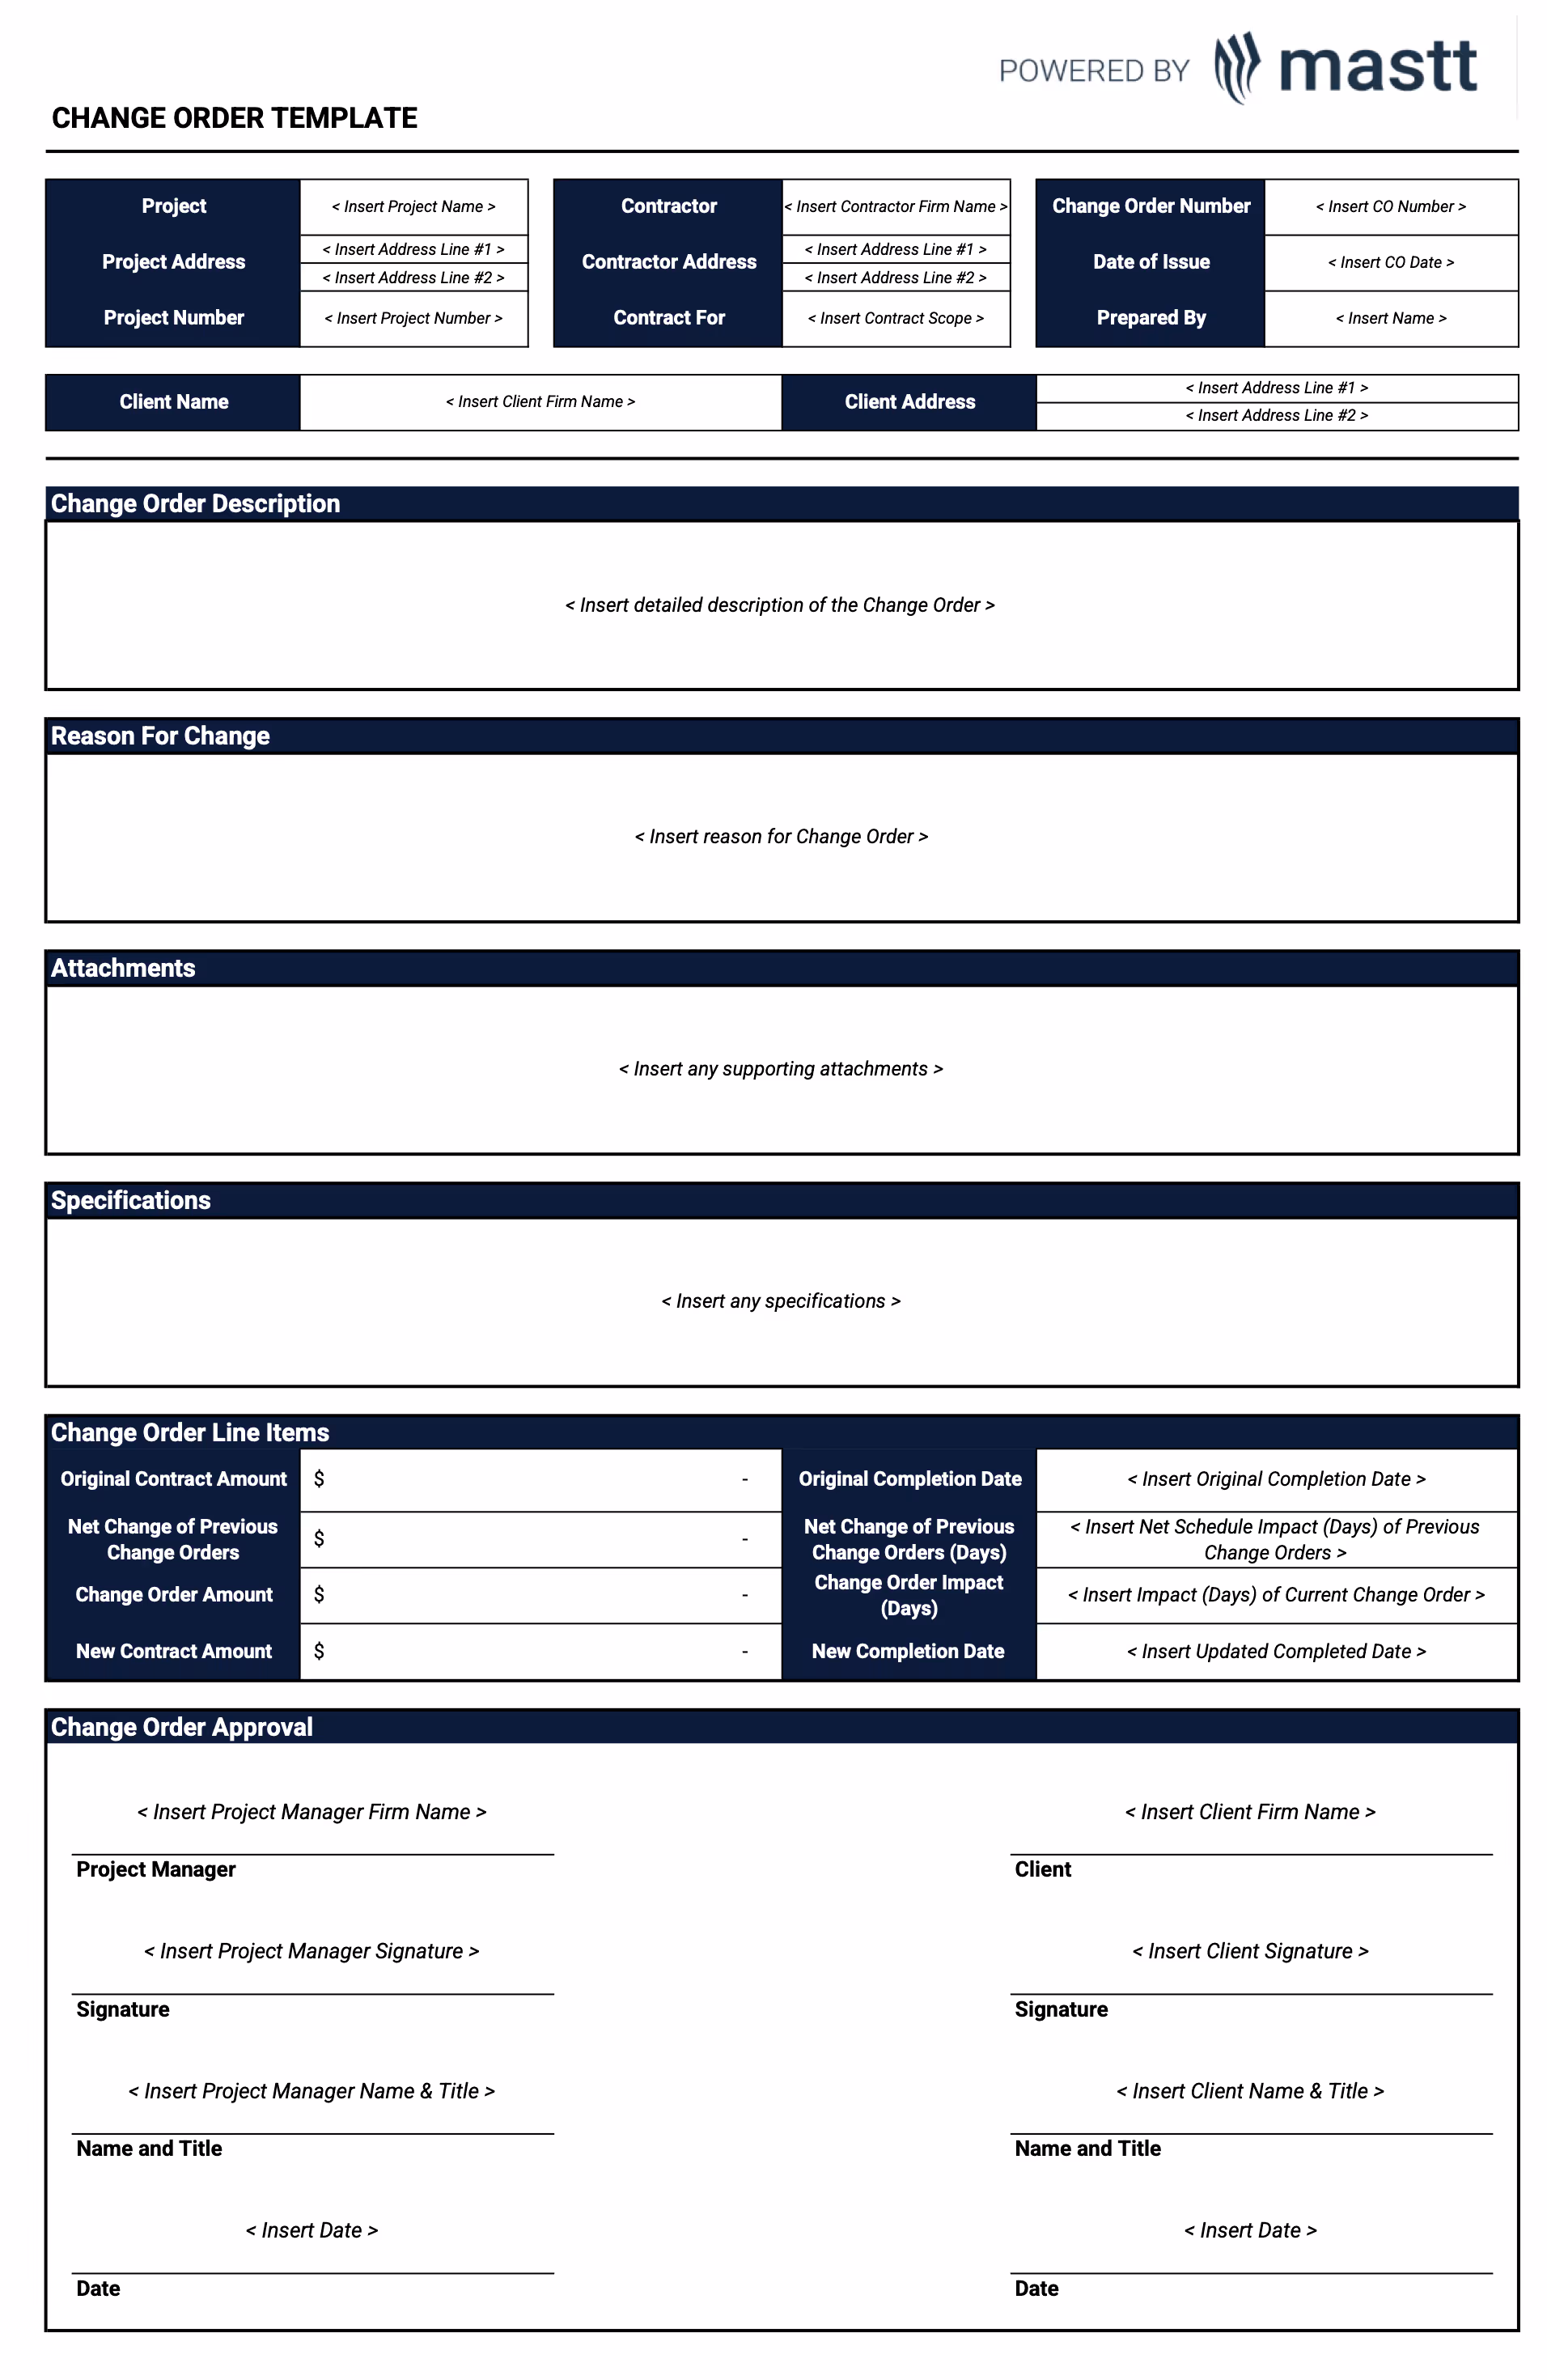
Use a standardized change order template if one exists. It helps keep things consistent and easier to review.
Step 5: Route for Review and Approval
With the documentation ready, send it to the people who need to approve it. Follow the process outlined in your contract. Don’t assume the same rules apply from project to project.
Approvers usually include:
- The client or the owner's representative
- The architect, superintendent, or contract administrator
- Sometimes, a project manager from the main contractor
Submit the change order through formal channels. This could include email, construction project management software like Mastt, or whatever system the team uses. Keep a record of when you sent it, who received it, and any feedback or questions that come back.
Avoid informal or verbal approvals. Even if a client says, “Go ahead,” without a signature or written confirmation, it’s not official. If something goes wrong or a dispute comes up, that verbal OK won’t protect you. Until you get formal approval, hold off on starting the work.
Step 6: Update Project Records and Contract Documents
Once the change order is approved, update all relevant records. This keeps your contract, cost tracking, and project schedule aligned with what’s actually happening on site.
Start by logging the change in your change order register. Assign a unique change order number and link it to the correct contract, drawing, or RFI. This makes it easy to track and reference later.
Then update:
- The contract value, if the change affects cost
- The project schedule or program, if there’s a time adjustment
- Internal budget and forecasting tools
- Procurement schedules, if new materials or trades are involved
If you’re using digital tools or construction software, make sure the approved change is reflected across all systems. Don’t assume the field team or subcontractors have seen the updated scope. Communicate changes clearly and ensure everyone’s working from the latest information.

Step 7: Implement the Approved Change
Only start work once the change order has been formally approved. That means a signed document is in place and all key parties are informed.
Communicate the approved change clearly to your site team, subcontractors, and suppliers. Make sure everyone understands:
- What’s changing
- Who’s responsible
- When the change takes effect
- Any specific instructions, materials, or sequencing adjustments
Hold a quick coordination meeting or site briefing if needed. Don’t assume people have read the paperwork. Walk them through the key points.
Track the change as it’s executed. Monitor progress, check for unintended impacts, and update your reporting tools accordingly. This ensures the change is delivered as planned and any downstream issues are caught early.
Final Thoughts on How to Do a Change Order
Change orders are a normal part of construction projects. But they don’t have to derail your schedule or budget. With a clear process, consistent communication, and the right documentation, you can manage changes smoothly and avoid costly surprises.
Act early, keep everyone aligned, and track every change with care. When you integrate best practices and reliable systems, change orders become a tool for control, not chaos.

Written by
Jacob Gibbs
Jacob Gibbs is the Customer Success Team Lead at Mastt. He guides capital project teams through onboarding and helps them get the most out of Mastt’s project management tools. With five years in customer success and a good track record supporting construction clients, Jacob brings a practical, hands-on approach to solving real project challenges.


Contributions by

Change Order Template
Use this change order template to document, track, and approve project scope or cost changes with accuracy and transparency.

Walk Into Every Meeting With Confidence, Clarity, and Control
No one wants to look unprepared, blindsided, or uncertain in front of stakeholders — but that’s exactly what happens without Mastt.
Start for FreeTrusted by the bold, the brave, and the brilliant across governments, Fortune 500s, and the world’s best in delivering the future

.avif)

