
.avif)

Every new construction project starts with the same admin setup. Contract, insurance, risk, and cost registers must exist from day one, and each one takes days to build from scratch. Claude Cowork shortcuts that set up by reading your project folder and drafting each register.
This guide shows how to use this AI in construction to set up a project, draft registers, populate contract data, and connect a live dashboard. Review every output before your team relies on it.
Prepare Claude Cowork for Construction Project Admin
Start with a small set of approved files and a dedicated project folder. The first test only needs enough information to build the registers and populate one contract record.
Before starting, prepare:
- The latest Claude Desktop app and access to Cowork
- A project brief with the objectives, budget, scope, location, delivery method, and key contacts
- A dedicated local folder for the project
- At least one complete project record for the first data test
- Access to the apps, add-ins, or connected tools required for your workflow. For example, install Claude for Excel if you plan to work with spreadsheets.
- Approval to process the project files under your organization's data rules
The recorded workflow uses a project linked to a local folder. Projects linked to local folders require Claude Desktop, even though Cowork also supports cloud sessions on other devices. Anthropic explains the difference in its current Cowork instructions.
Keep the first test narrow. A clean brief and one contract make errors easier to find before the team adds live project records.
How to Use Claude Cowork for Construction Project Admin
Use Claude Cowork for construction project admin by adding a project brief and local folder to a Claude Project. Ask Cowork to identify the required registers and review its plan before approving the workbook. Then use Claude for Excel to add contract data and a live artifact to present the data in a dashboard.
Step 1: Create a Claude Cowork project
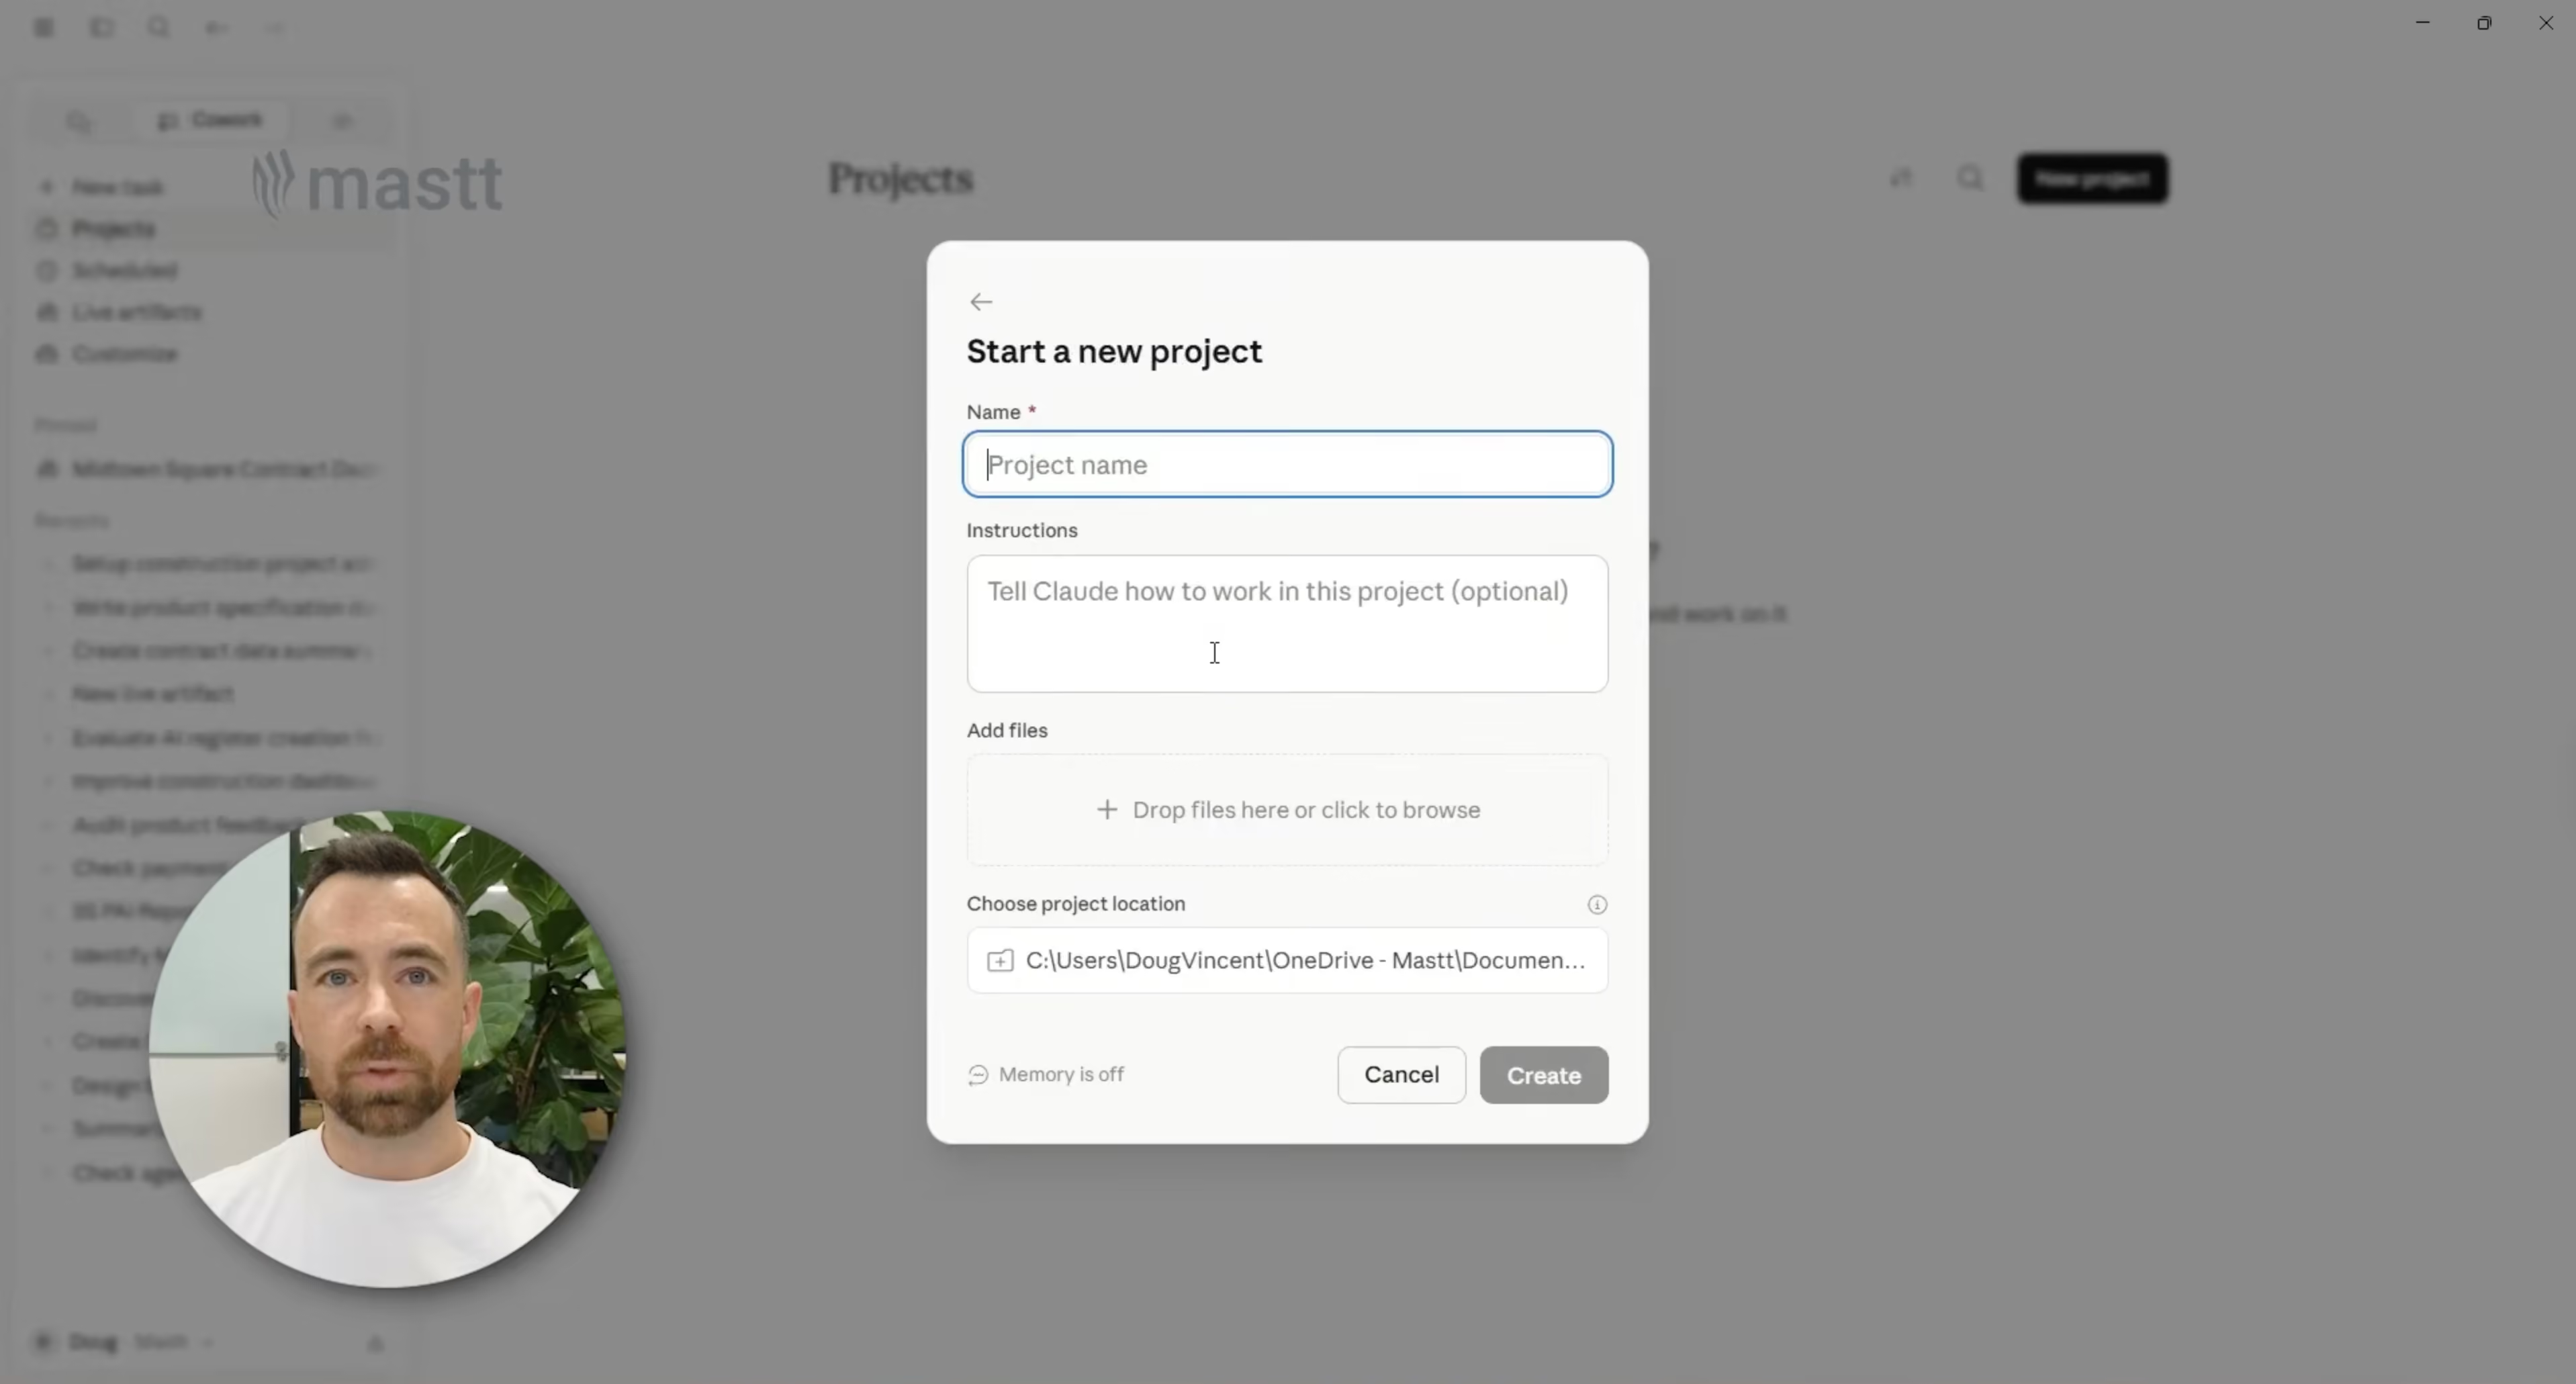
Open Claude Desktop and select Projects. Start a new project, choose Start from scratch, and enter the project name. Add the files Cowork will need for the first task, select Create, and then choose the local folder Cowork will use. Use a folder name that matches the project so it is easy to identify later.
The project and the local folder serve different purposes. The Claude project keeps the brief, prompts, and task history together. The local folder gives Cowork a place to read approved source material and save the files it creates. Keeping both under the same project name makes the workflow easier to follow when you return to it.
Check that the data in the project matches the copy in the working folder. Cowork will rely on that document when deciding which registers the project needs, so remove older versions that could cause confusion.
Once the correct brief and folder are in place, leave the project open. You will use the same project in Step 2 to ask Cowork for a day-one register plan.
Step 2: Ask Cowork to identify the registers needed
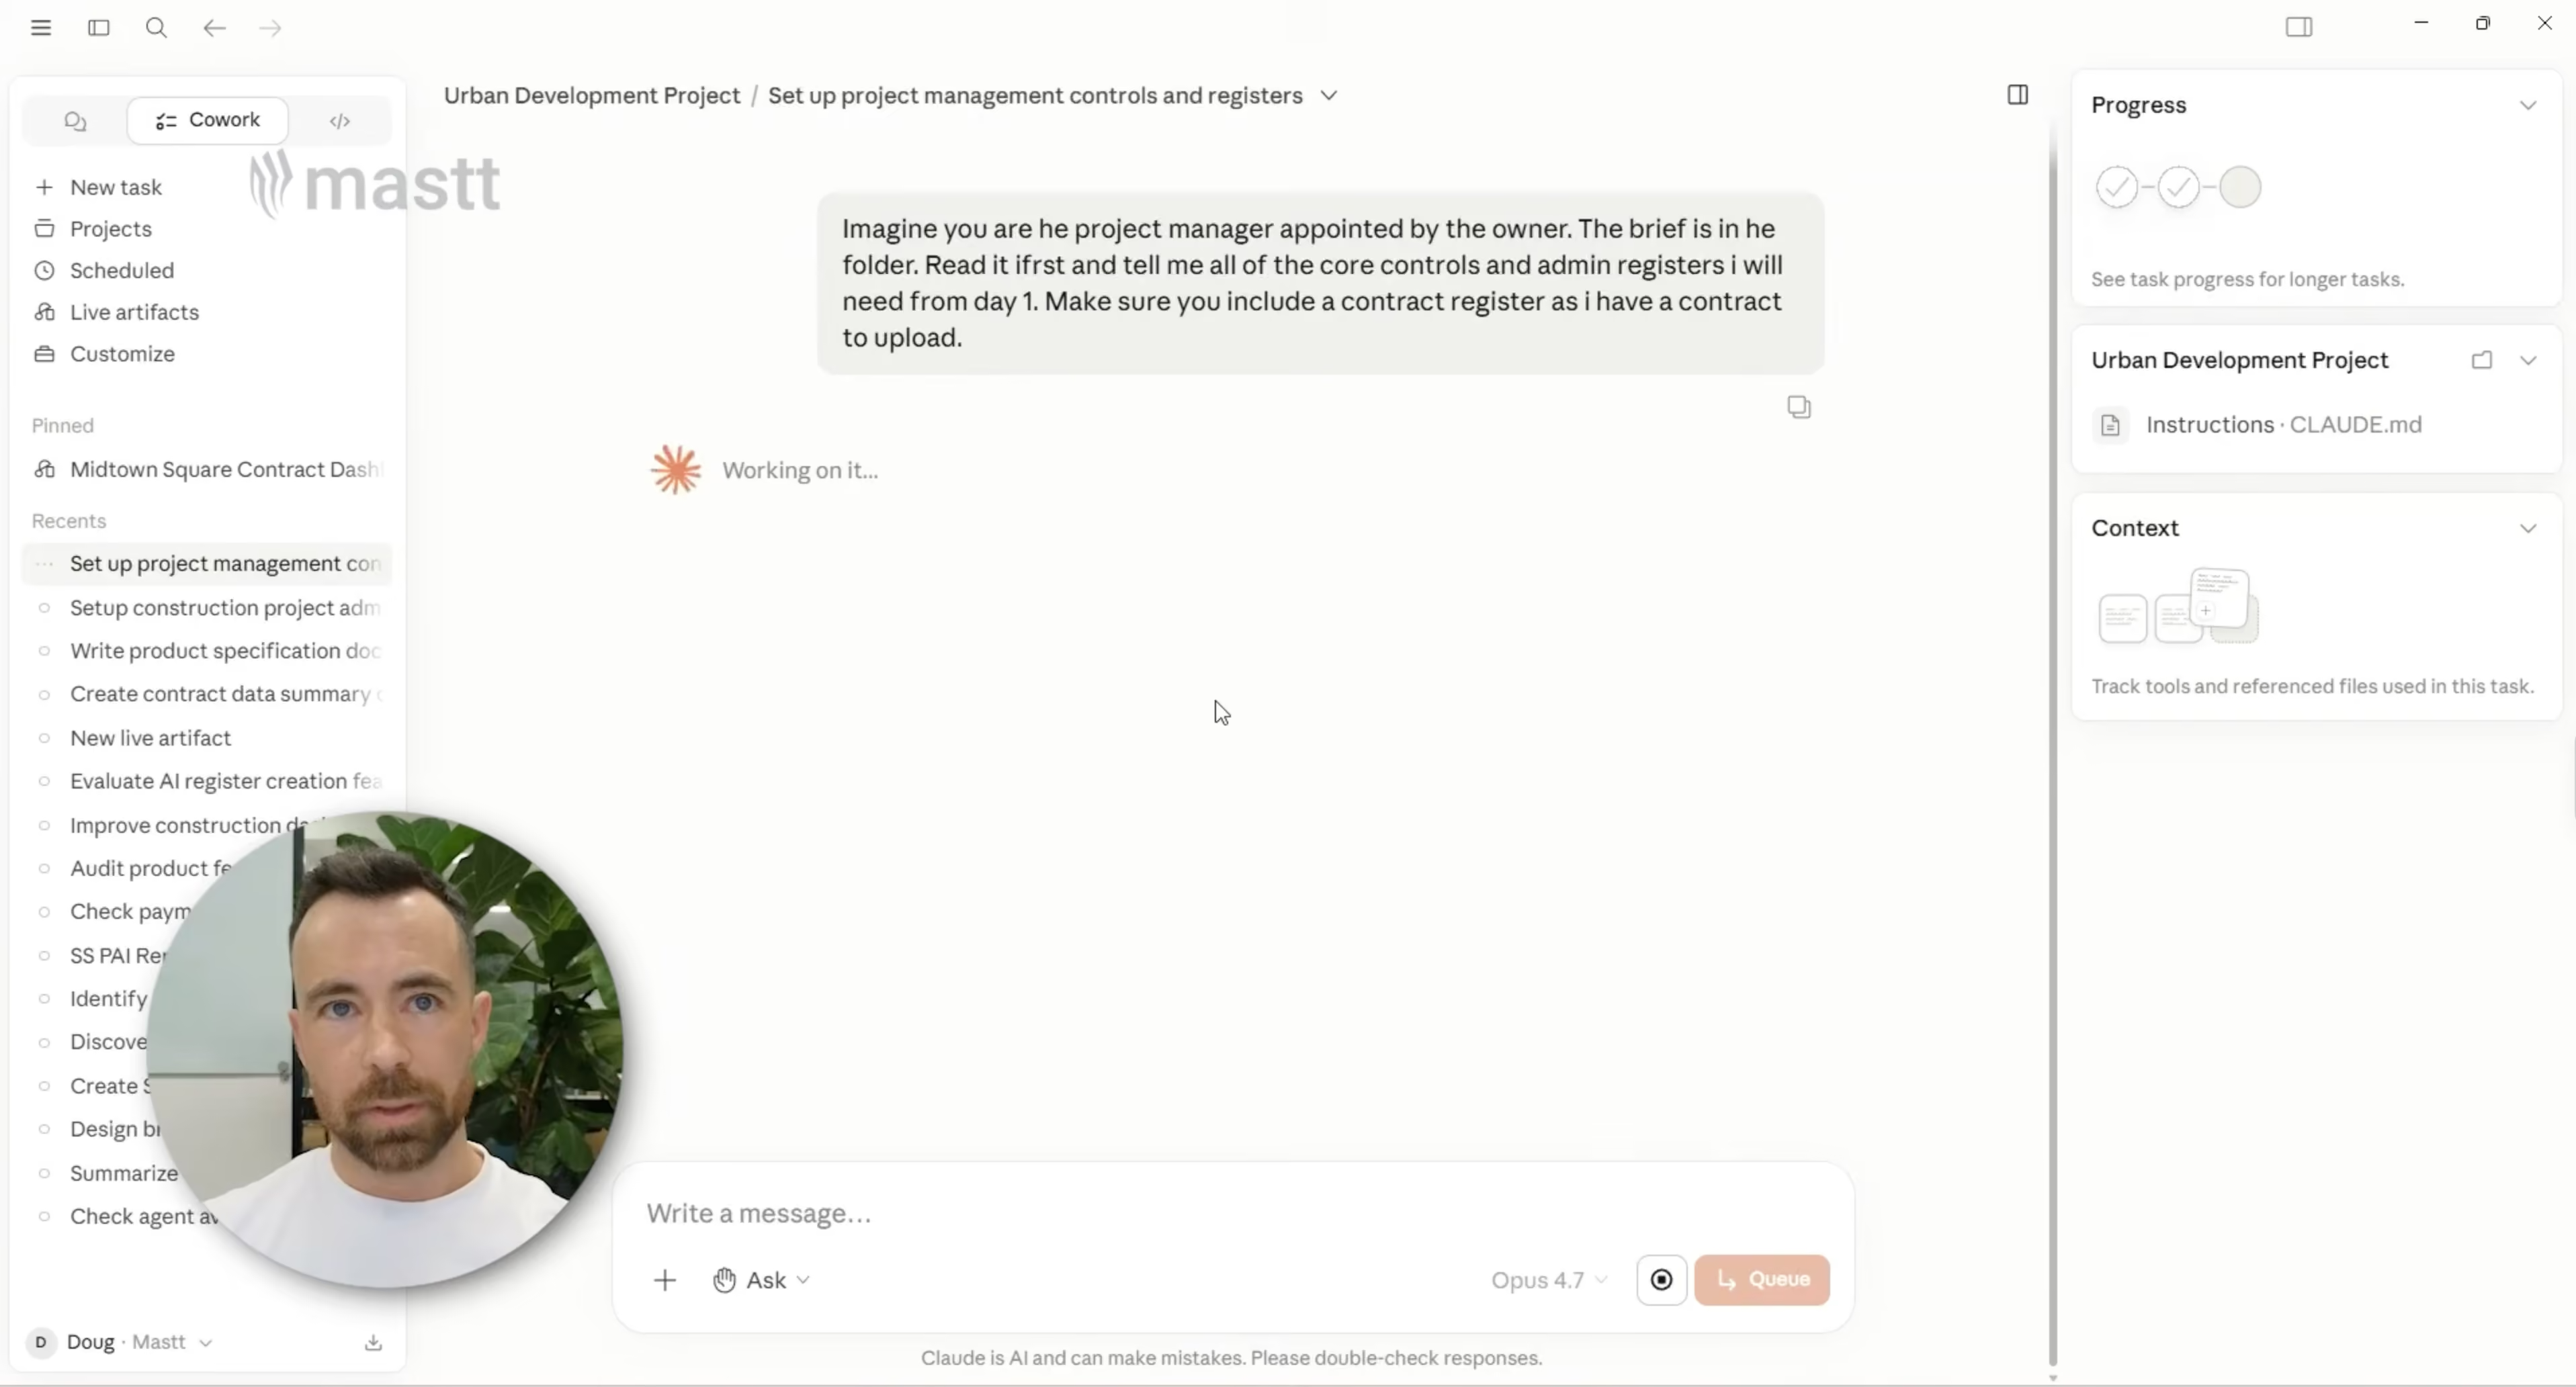
Open a new Cowork task inside the project. Ask Claude to read the brief and identify the controls and admin registers that the owner’s project manager will need from the start.
Sample prompt:
Imagine you are the project manager appointed by the owner.
The brief is in the folder. Read it first and tell me all of the core controls and admin registers I will need from day one.
Make sure you include a Contract Register, as I have a contract to upload.
The prompt gives Claude a role, points it to the project background, and states the required output. The brief supplies most of the detail, so the first request can stay short.
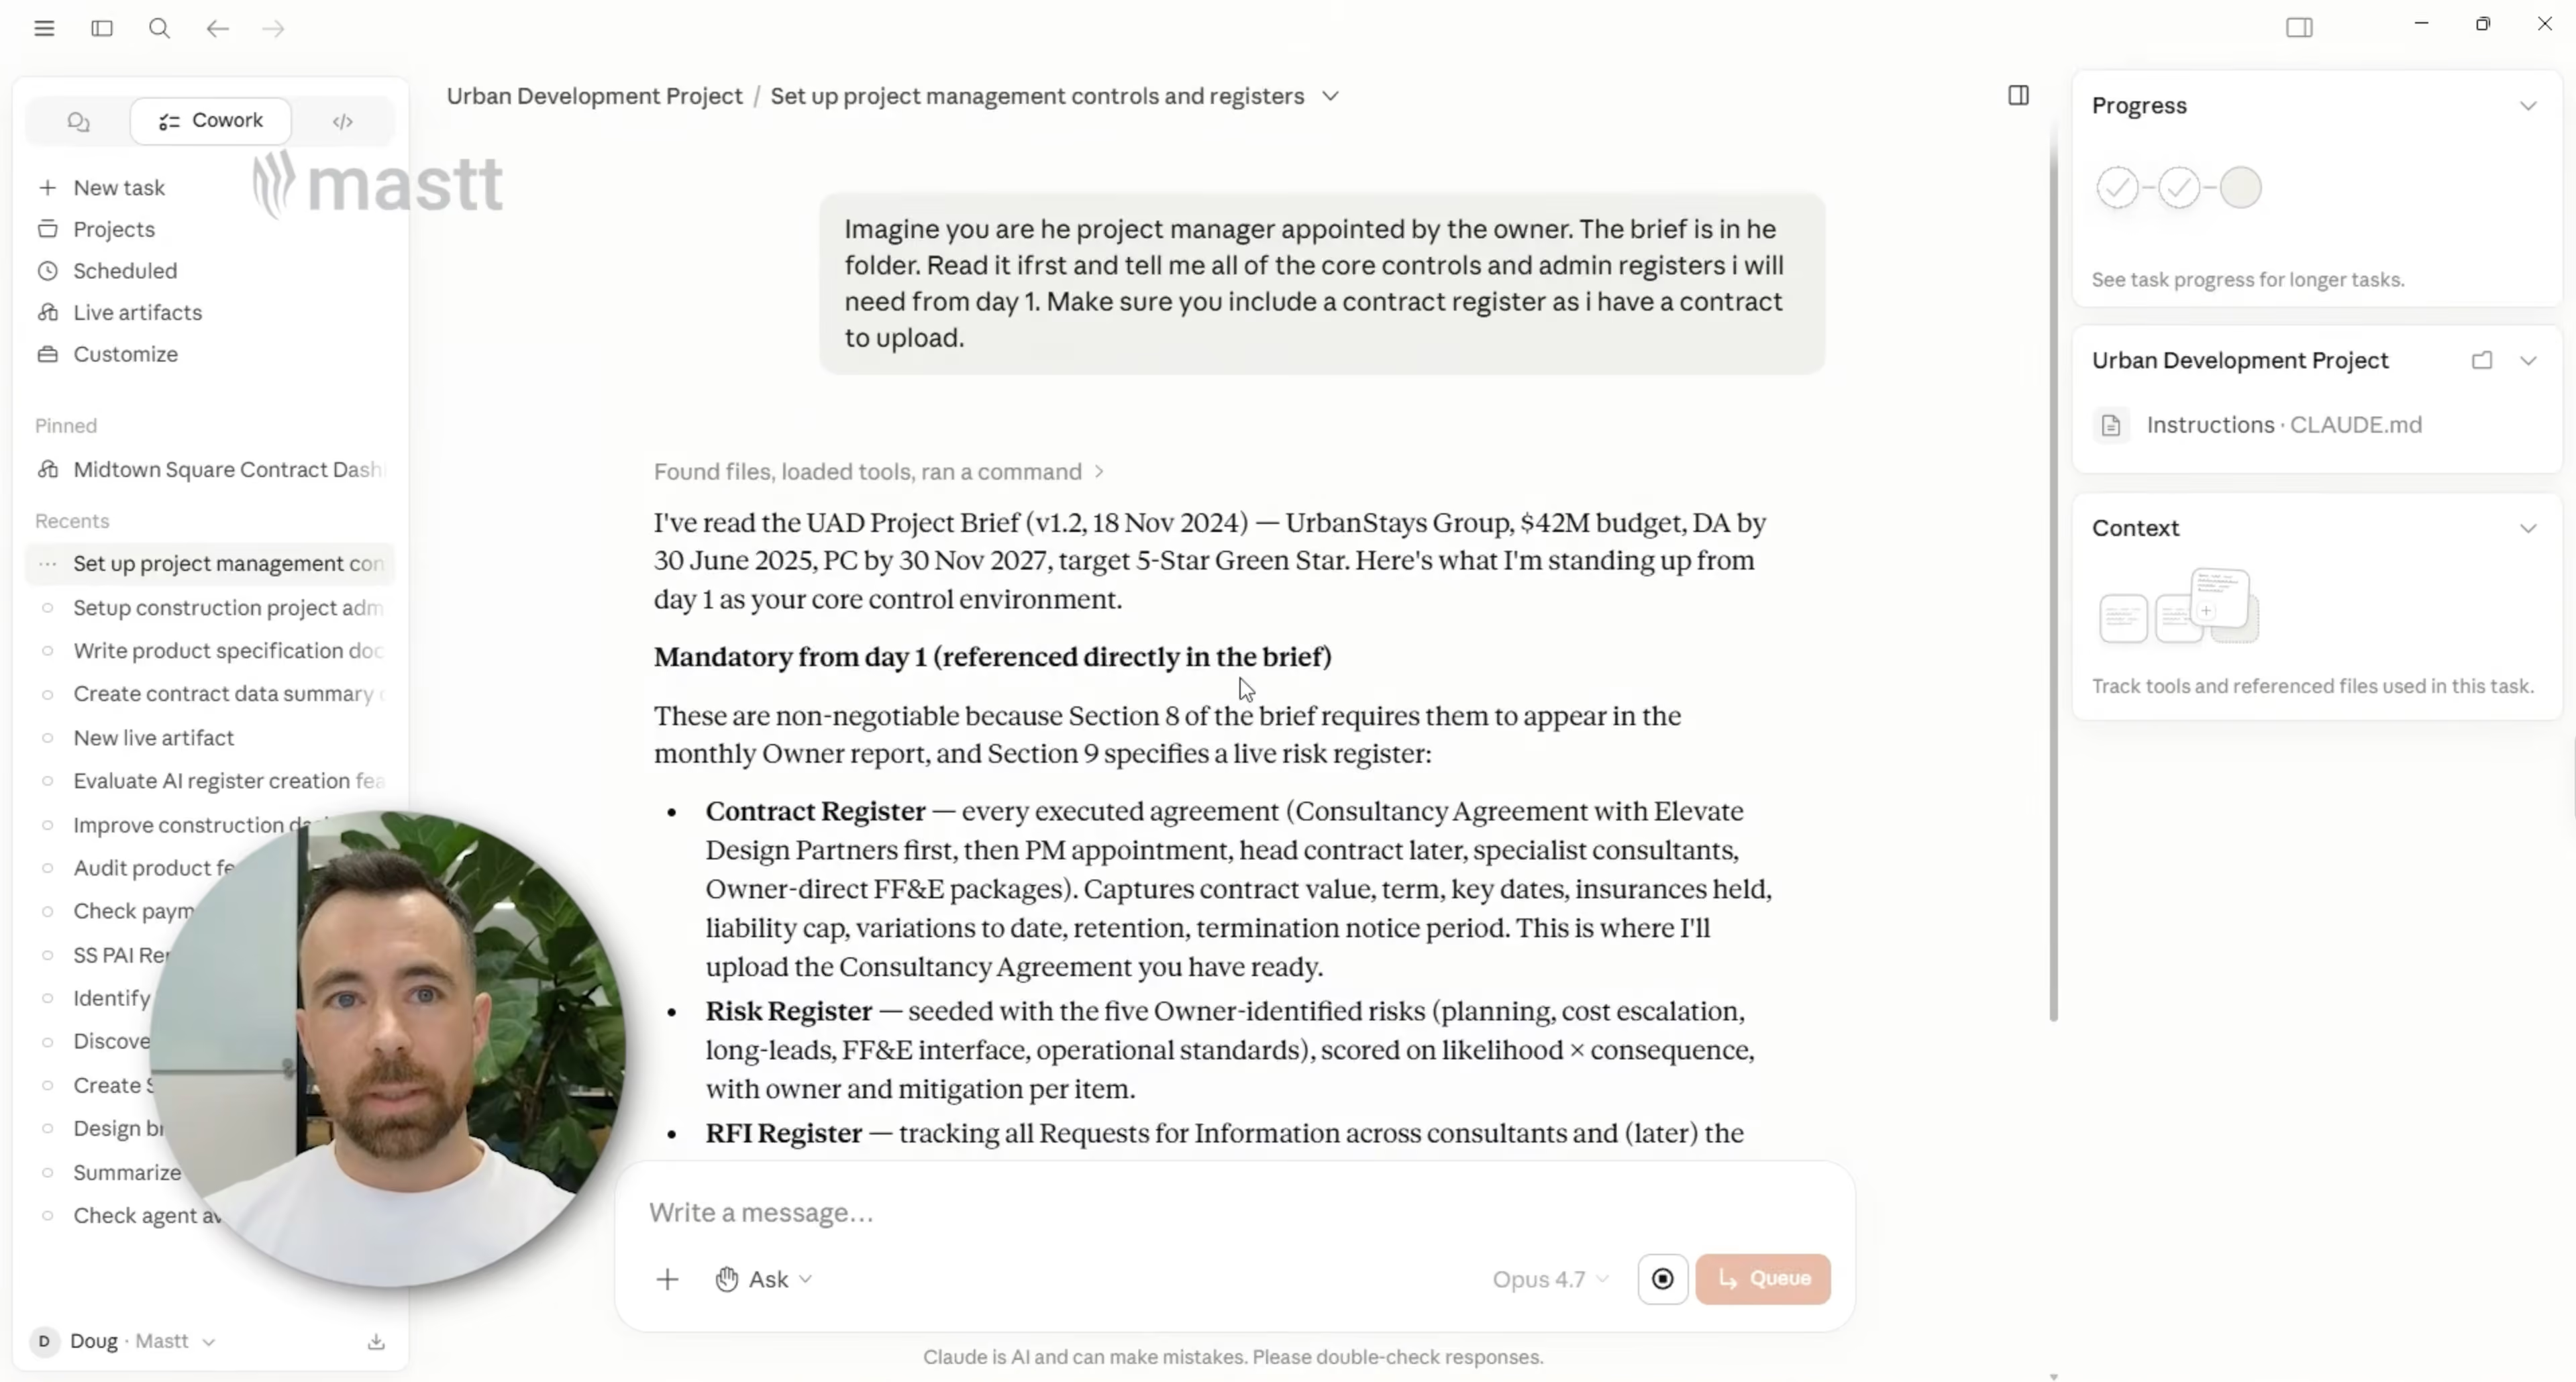
You can add the project location or region if you want the response to use local construction terms. Cowork should return a back-brief that lists the registers it proposes to create. Do not ask it to build the files yet.
💡 Pro Tip: Give Cowork the local context too, like the region, jurisdiction, and any owner-specific reporting rules. The register list gets more accurate when Claude knows the standards it should be building to.
Step 3: Review the register plan before Claude creates files
Read the back-brief before approving any file creation. Check whether the proposed registers suit the project and cover the admin work needed from the start. If a register is missing, ask Claude to add it. If the plan includes something the team will not use, ask Claude to remove it.
Keep reviewing the response until you are happy with the planned setup. This back-brief gives you a chance to correct Claude while the work is still a written plan. Changes take longer once the workbook and its tabs have already been created.
No new prompt is required for this review. Reply in the same task with any changes you want Claude to make. Continue to Step 4 only when the register plan is ready to build.
Step 4: Create the construction project registers with Cowork
Once you have approved the back-brief, tell Cowork to create the registers.
Sample prompt:
Please proceed and create.
The short instruction works because the source files, request, and agreed plan are already part of the same Cowork task. Claude can continue from the approved back-brief without a second detailed prompt.
Open the local project folder after Cowork finishes. Depending on the plan, Cowork may create one workbook with several worksheets or separate files for different controls. Open the files and check what was created before adding project data.
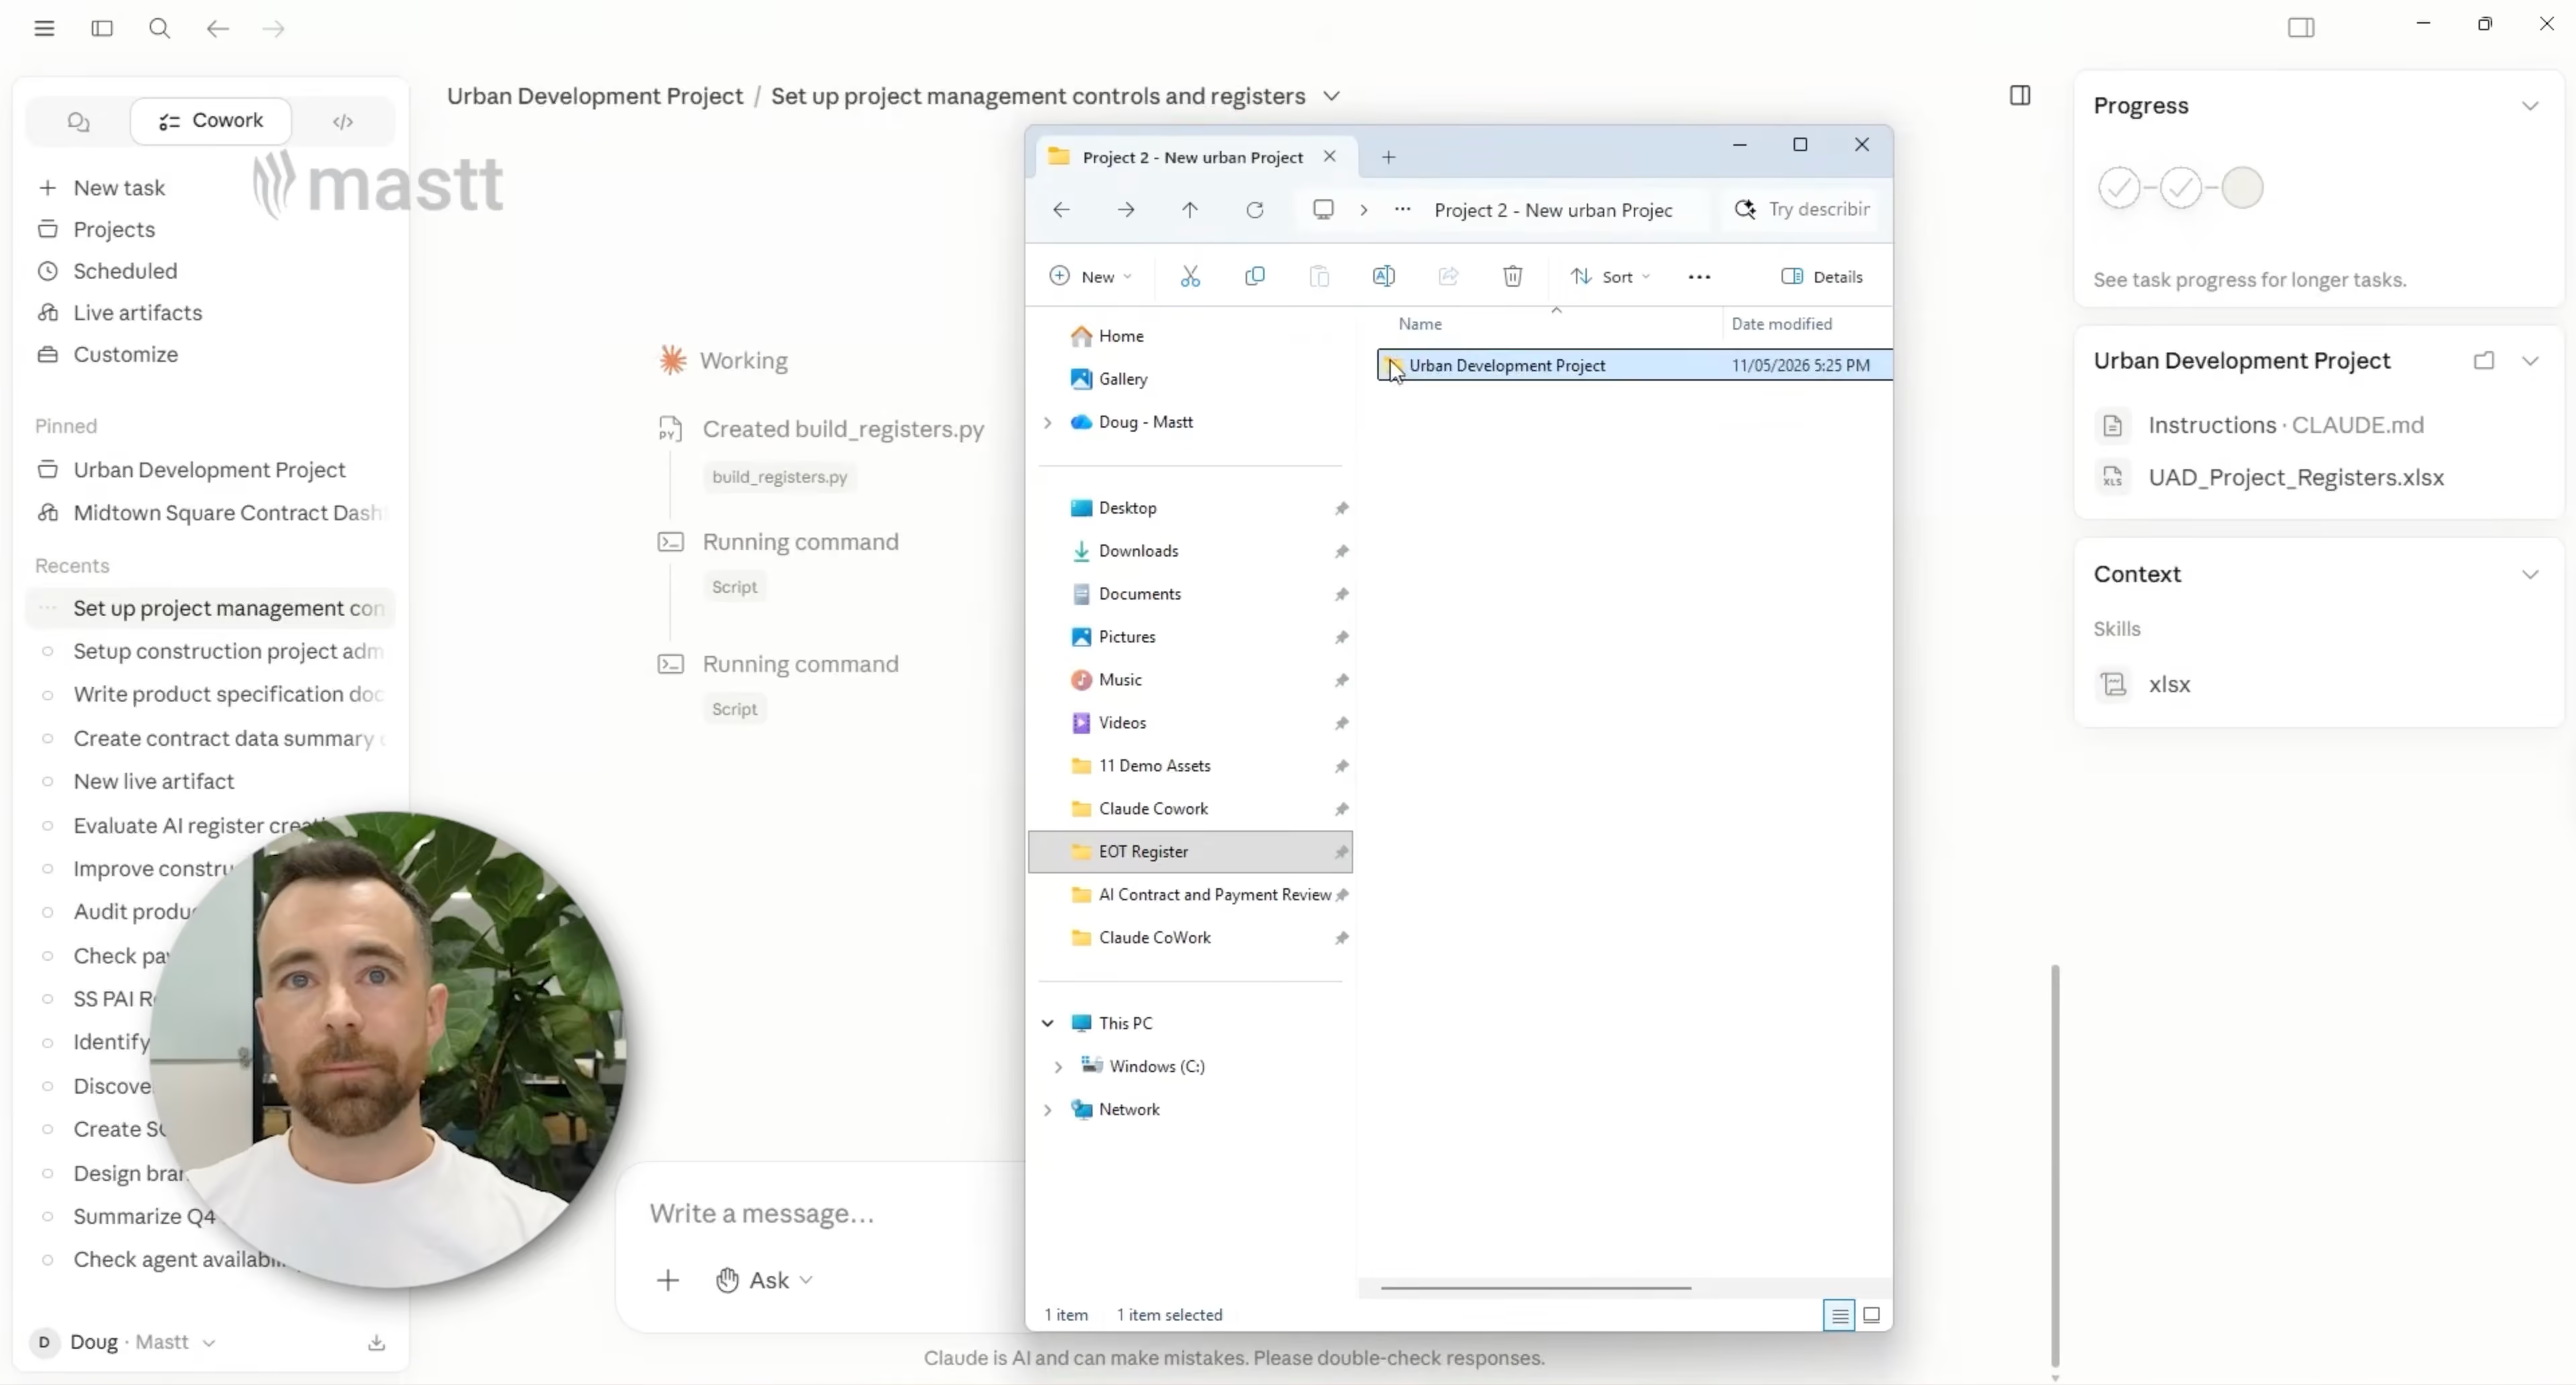
Step 5: Review the files and populate
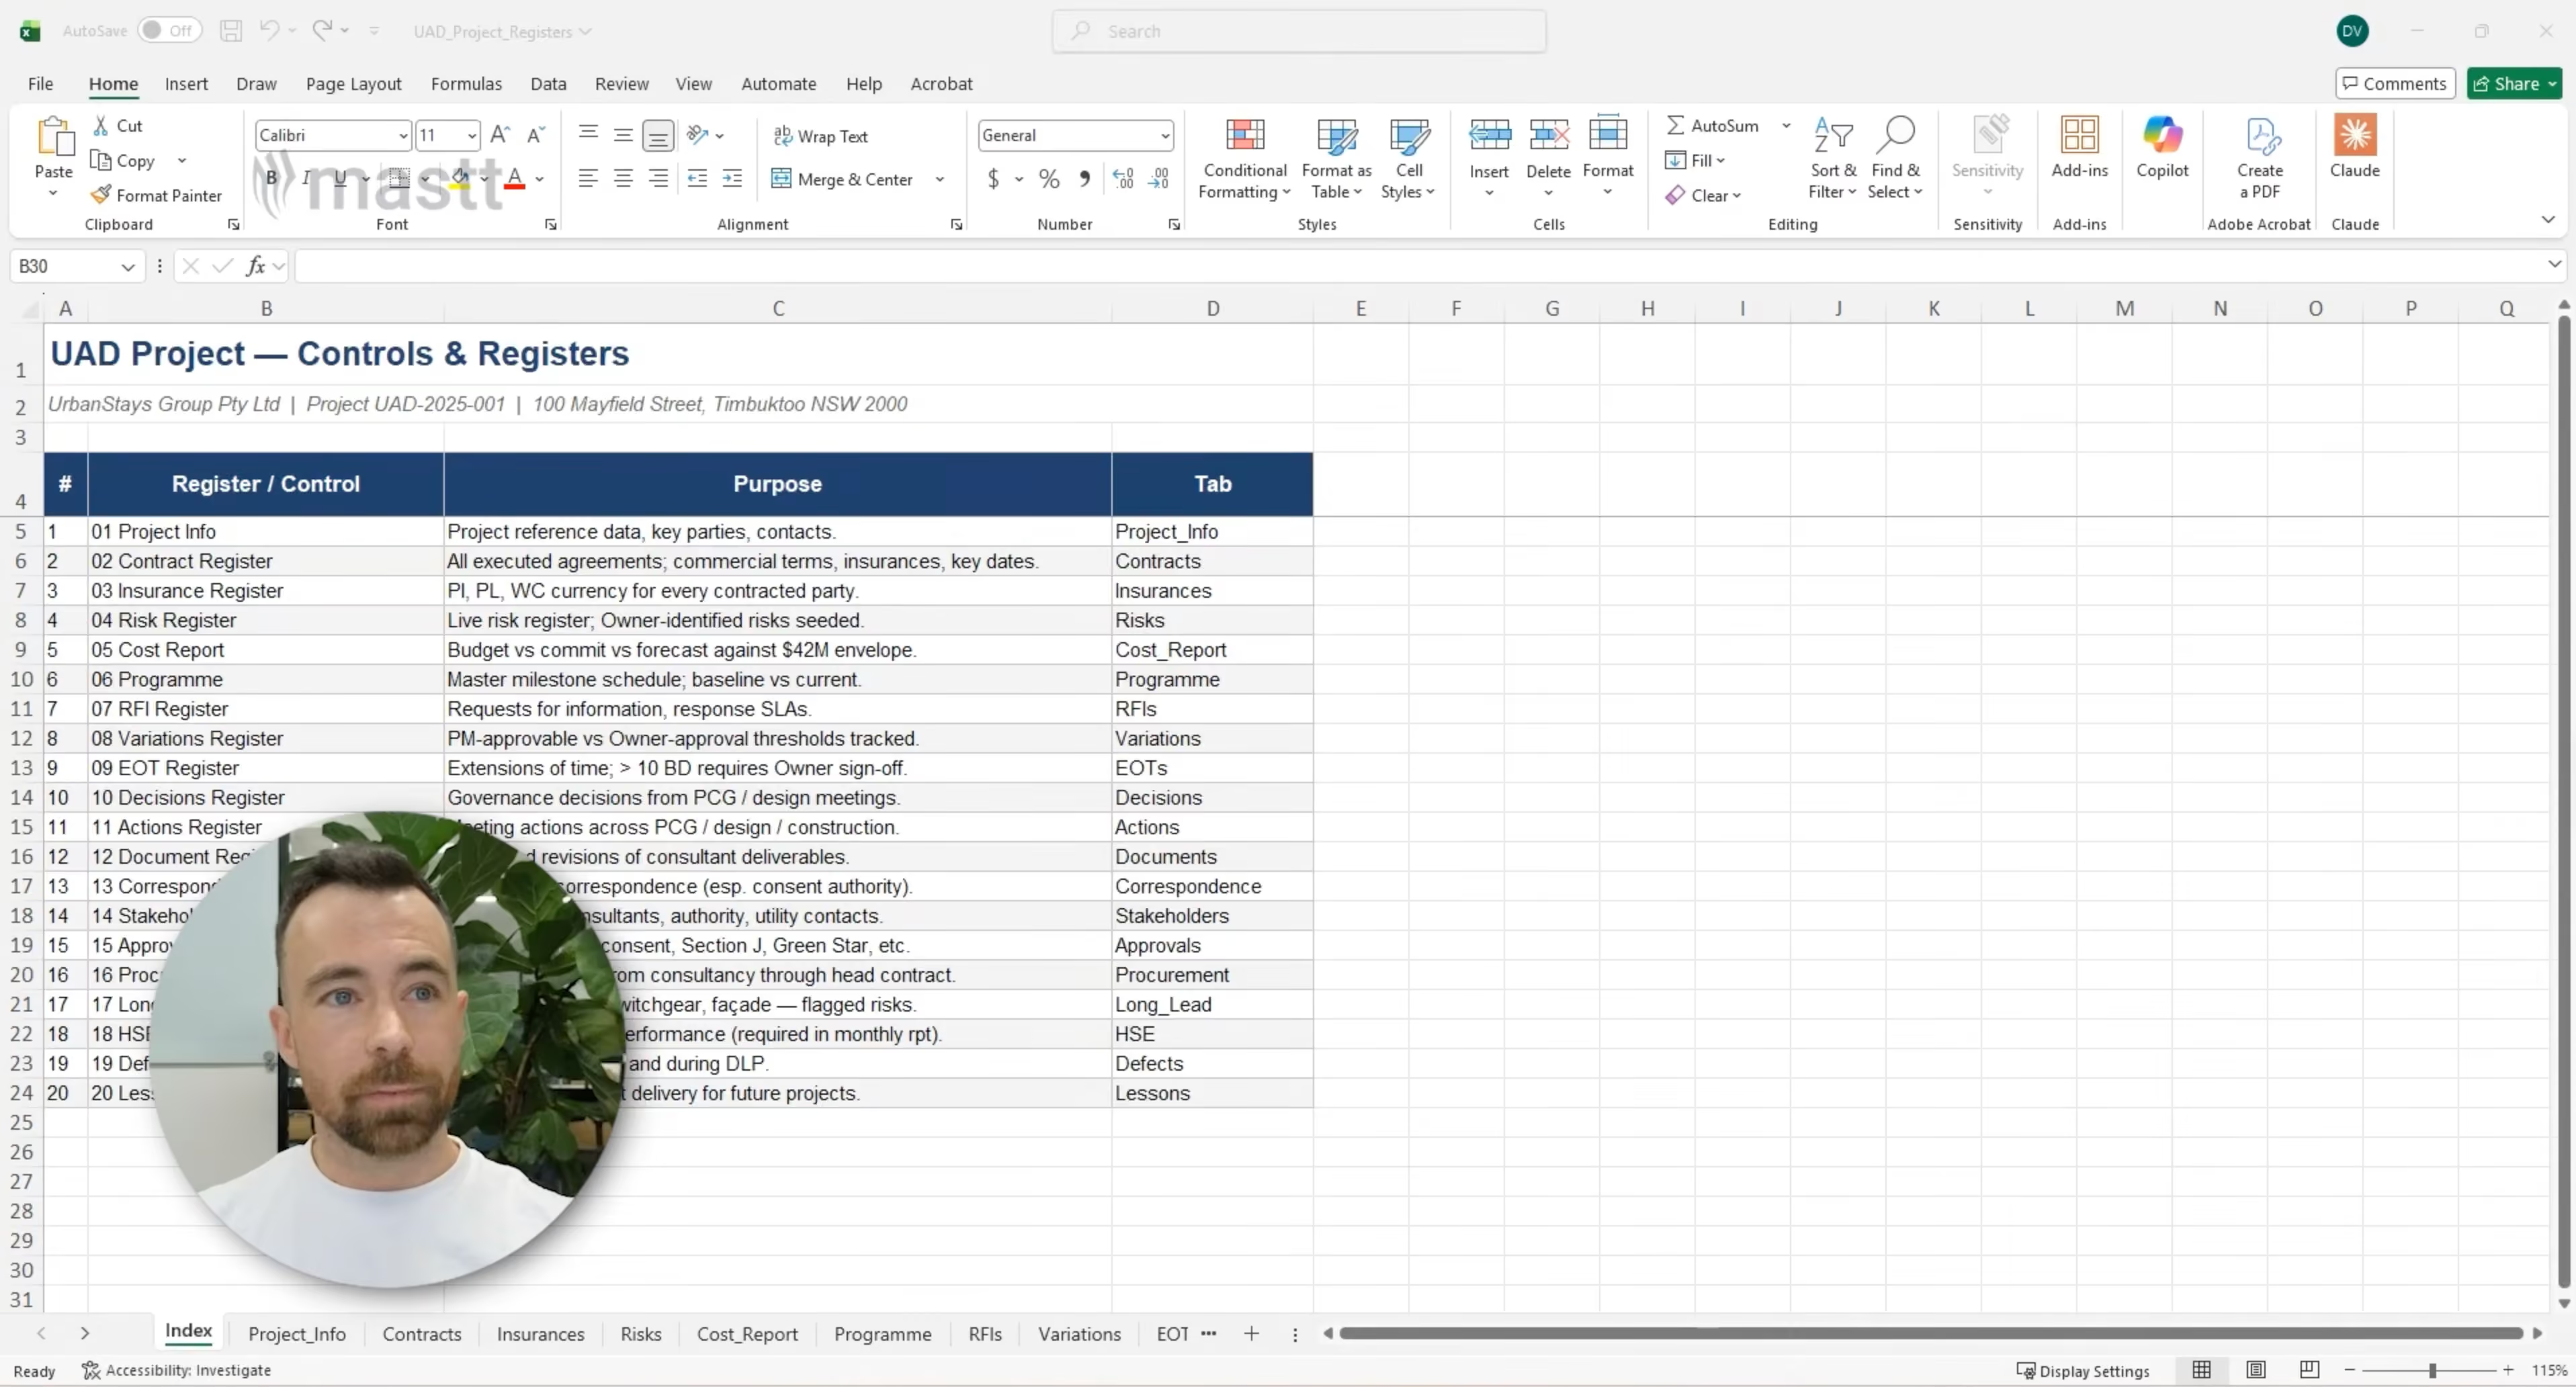
Open the workbook or files Cowork created. Review the headings, worksheets, and any sample entries so you can see how the information has been arranged. Then choose one register or report to populate first.
For example, Cowork may create a workbook containing a Contract Register, Risk Register, Cost Report, and Document Register. You can begin with the Contract Register when signed agreements are ready to add. The same approach works with another worksheet when its source data is available.
Cowork may place dummy entries in some worksheets. Clear those rows from the register you plan to populate, while keeping the worksheet and column headings in place. Some files may begin with a basic layout that can be developed through further prompting.
Keep the selected workbook open in Excel. The empty register is now ready for project data from its matching source file.
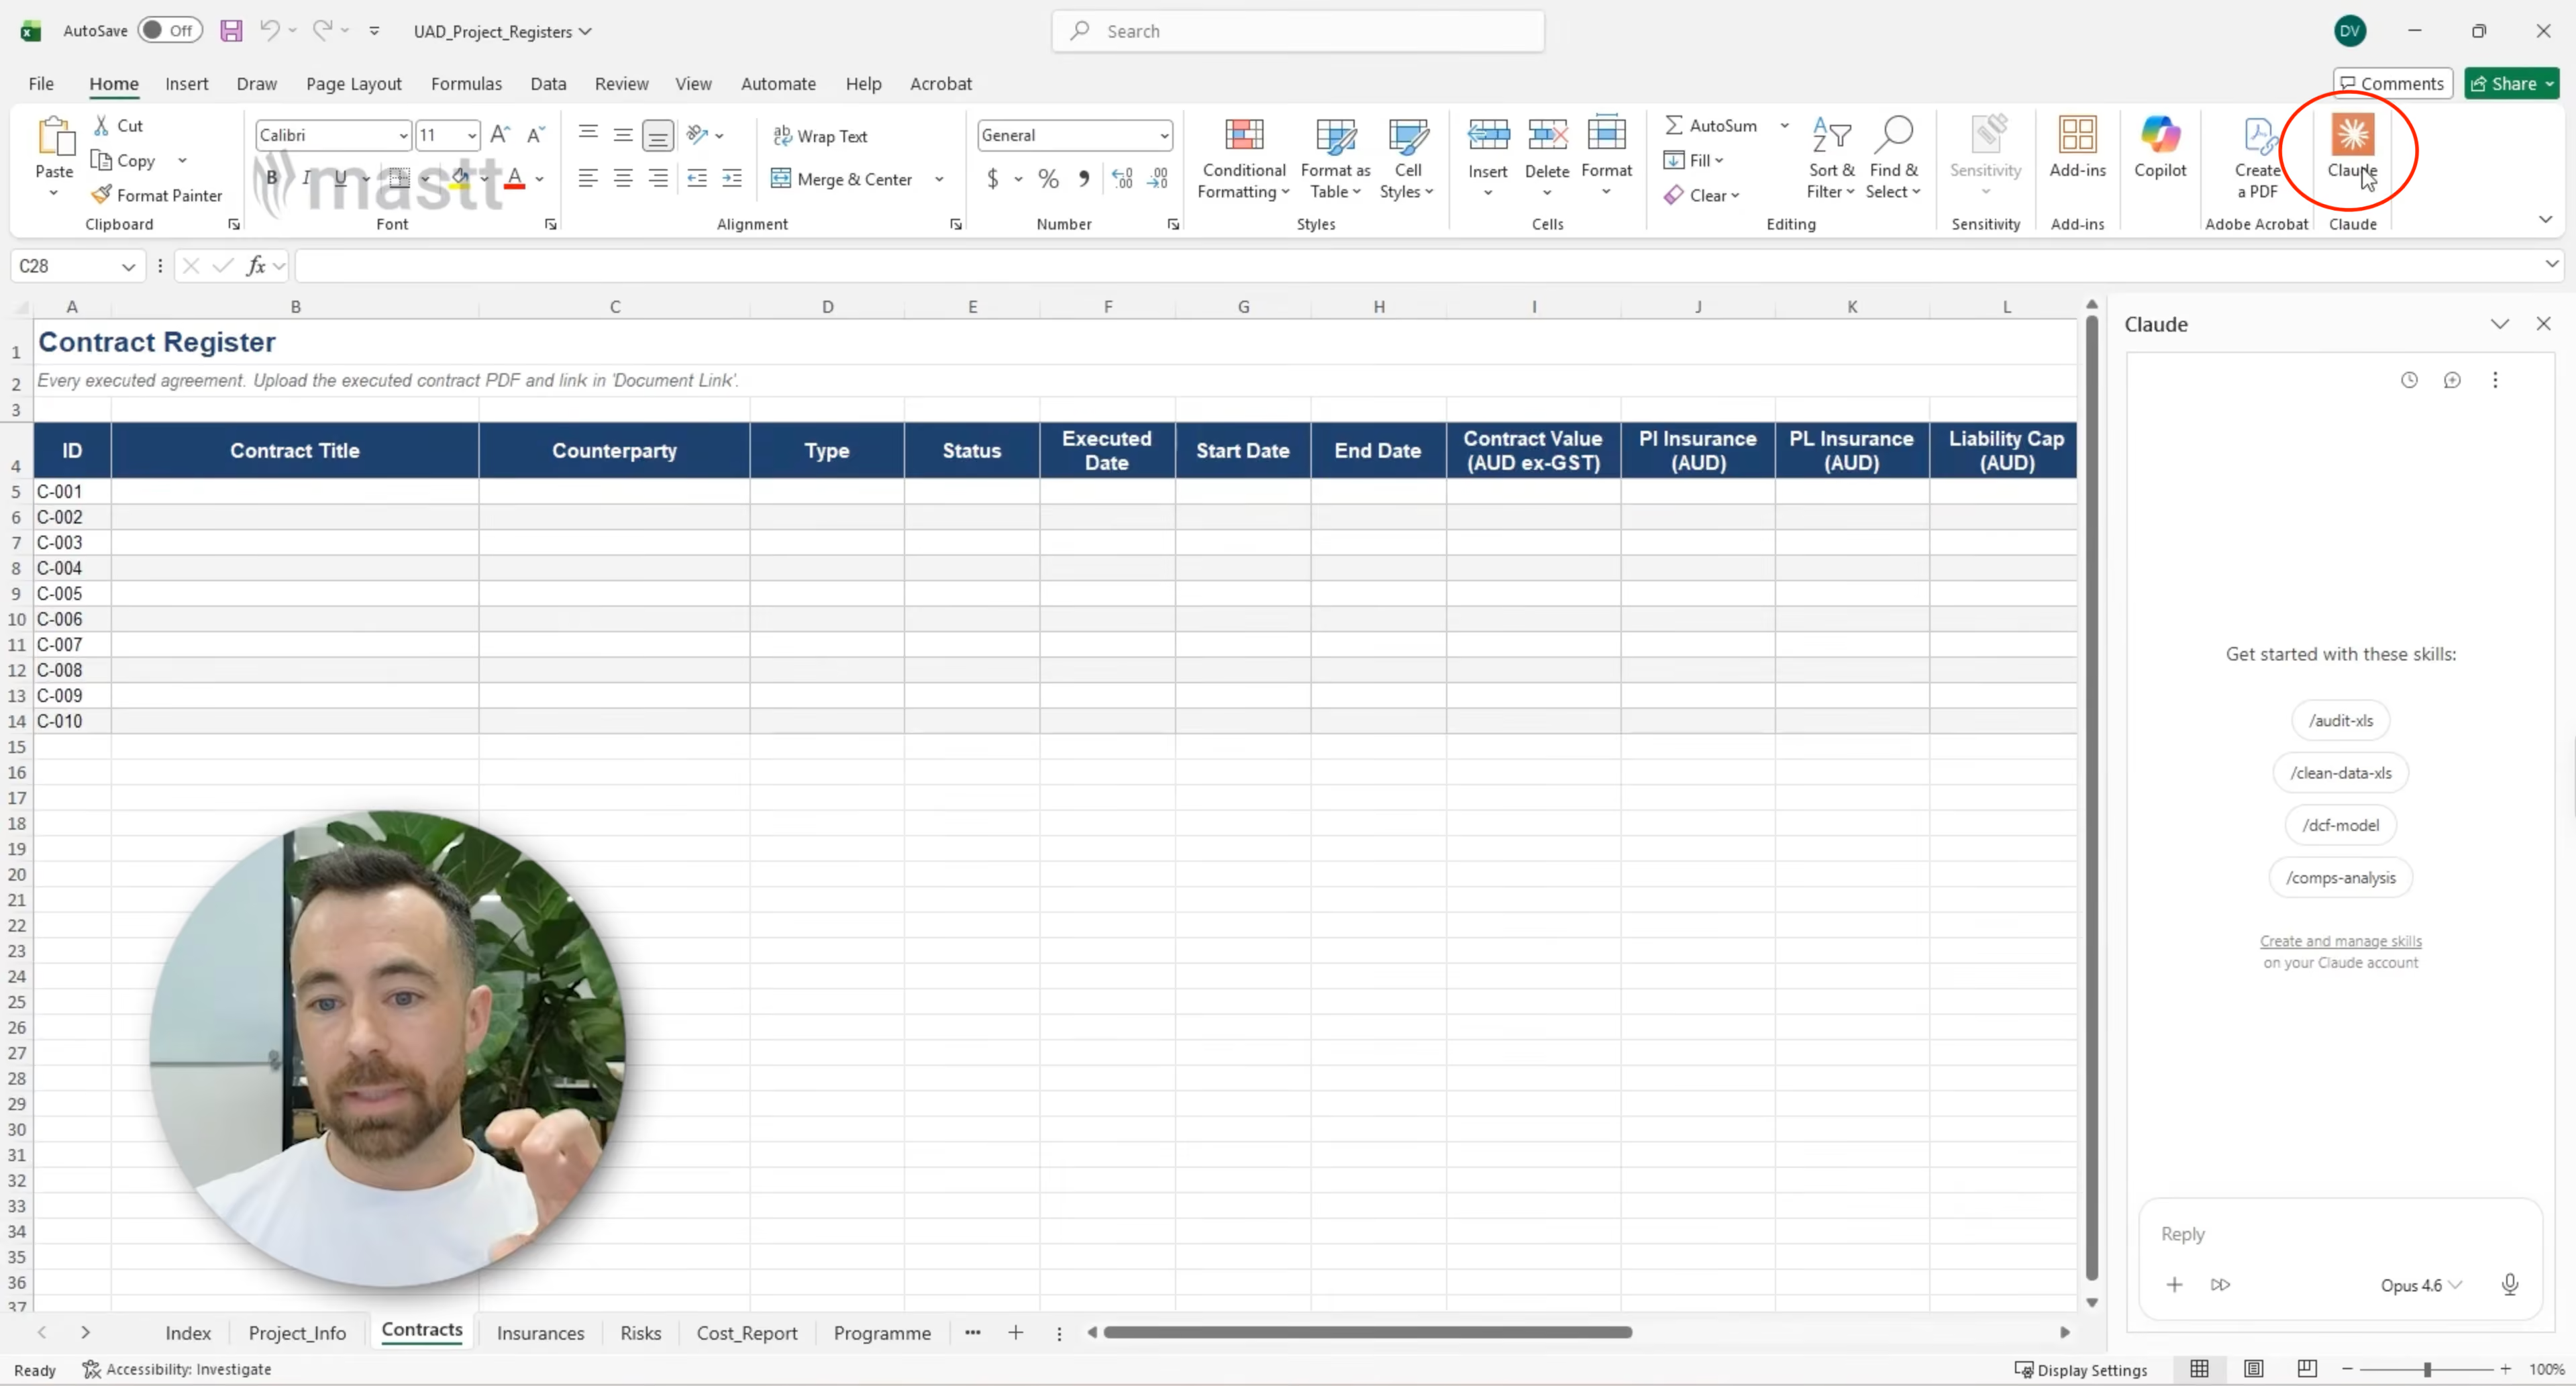
Step 6: Use Claude for Excel to add project data
Open the Cowork workbook in Excel. If Claude for Excel is not already open, select Add-ins in the top-right area and insert Claude. The Claude panel will open inside Excel and can read and write directly in the spreadsheet cells.
Drag the consultant agreement into the Claude panel. Claude can read the contract terms, fee schedule, and key personnel from the document. Ask Claude to add the agreement to the Contract Register.
Attach the source file that matches the selected register. A contract or consultant agreement can supply contract data. A cost plan can supply budget data, while a drawing list can supply drawing details. Ask Claude to add the information to the correct worksheet.
General prompt:
Please add the information from [SOURCE FILE] into [REGISTER OR WORKSHEET].
For the Contract Register example, use:
Please add this Contract into the contract register.
Claude for Excel will read the source and fill the existing fields. Watch the selected worksheet as the information appears. You can repeat the process with more source files when several records need to be added.
If you need to process a complete drawing package, see our guide to using AI to read construction drawings.
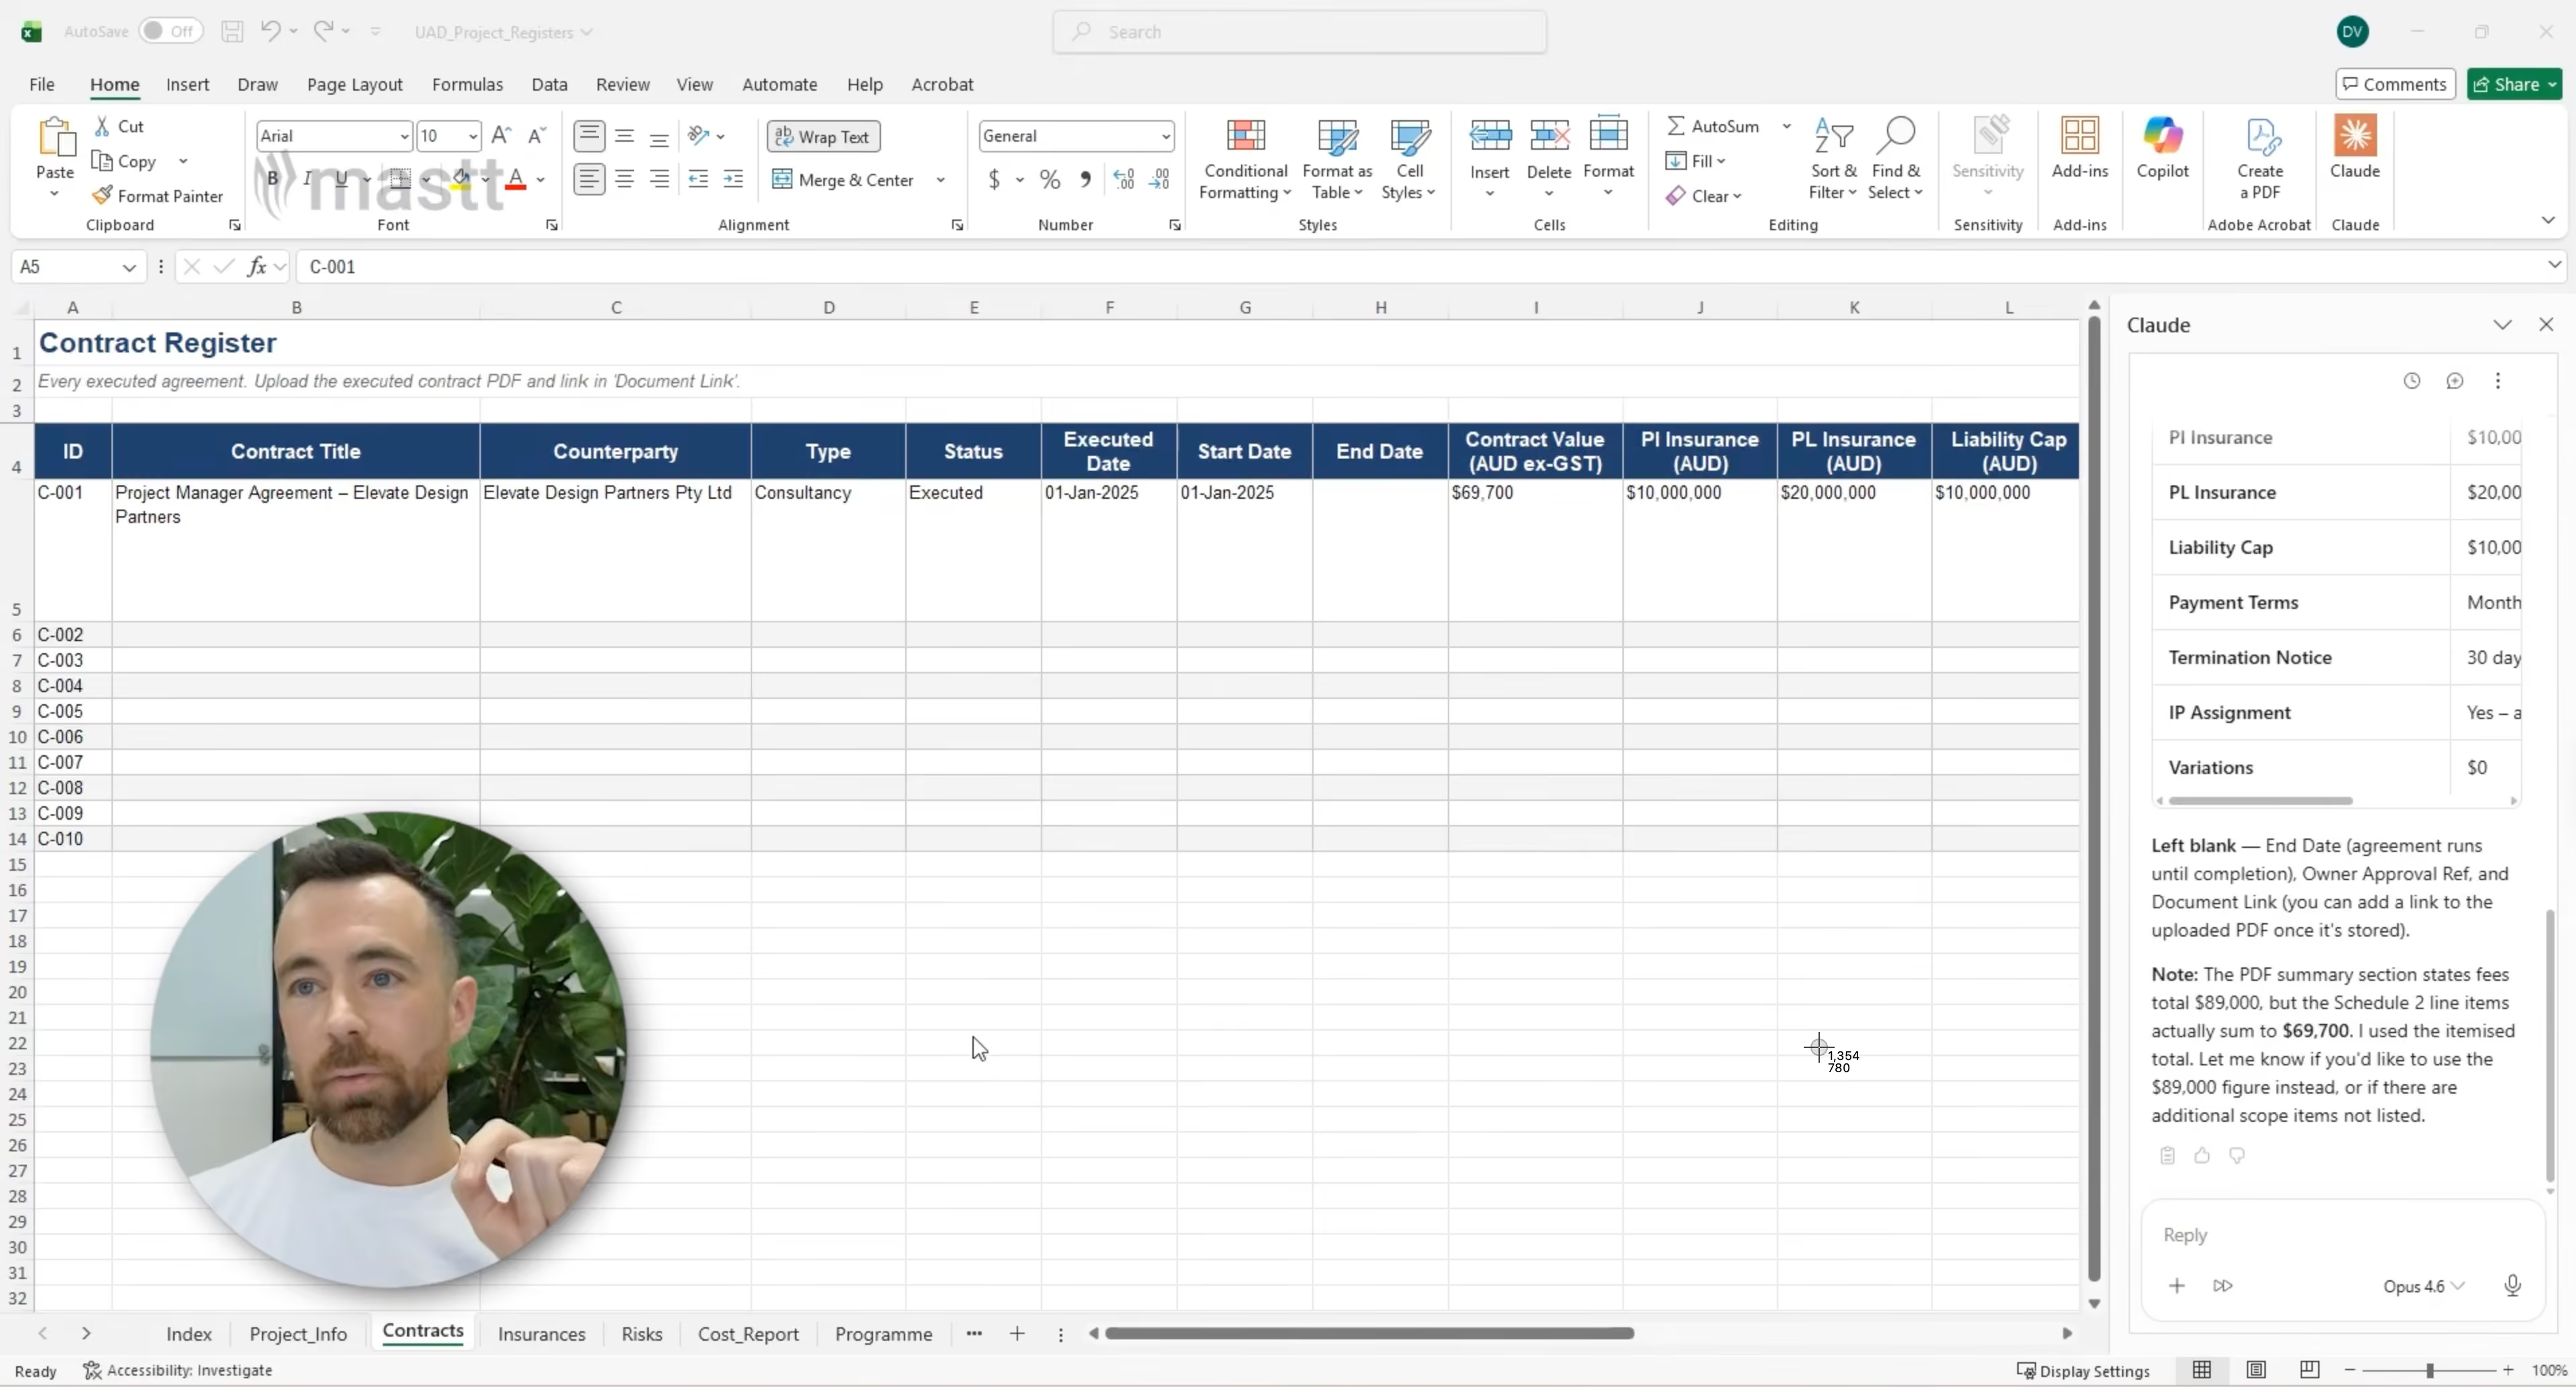
Step 7: Turn the template into a working project record
Wait for Claude for Excel to finish adding the data, then save the workbook in the local project folder. The selected worksheet now contains project information in place of the dummy entries.
In the Contract Register example, the saved workbook contains details from the uploaded agreement. If you chose another output, the workbook may contain cost, risk, document, or drawing data instead.
The remaining worksheets can stay empty until their source files are ready. One populated register gives Cowork enough data to create and test the first reporting view.
Return to the Cowork project after saving the workbook. Cowork can now use the updated file in the local folder to build a live artifact.
Step 8: Build a live artifact dashboard in Cowork
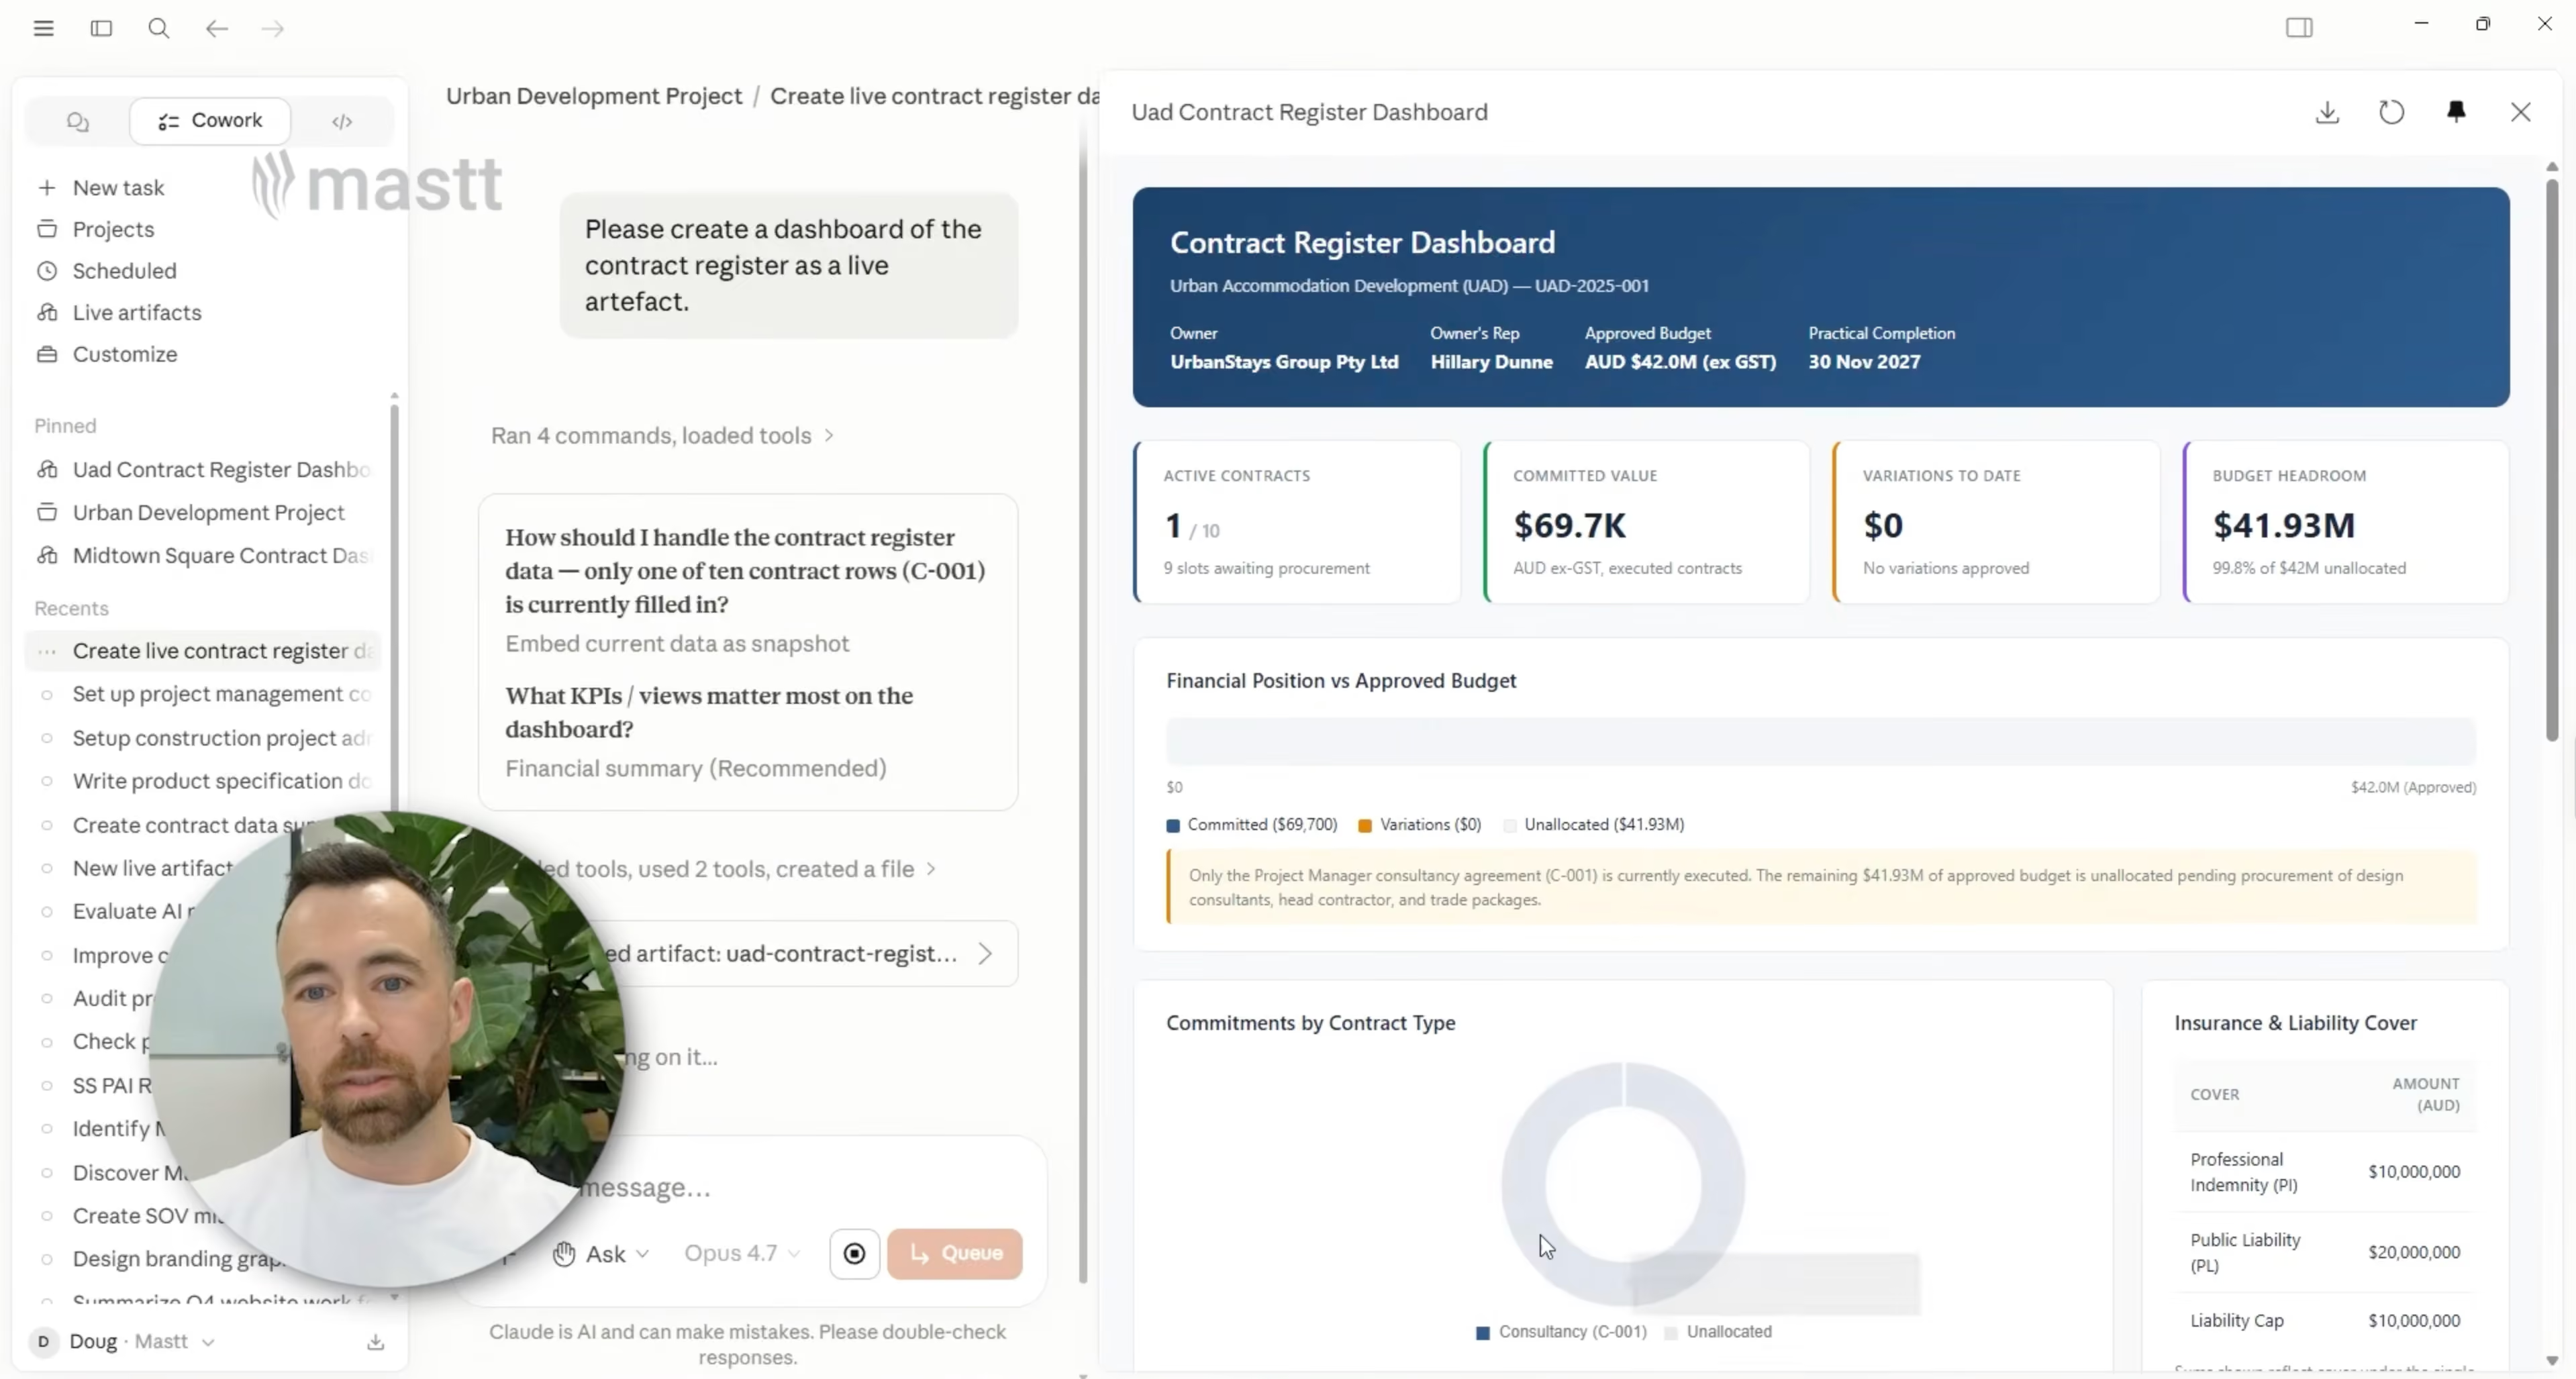
Return to the Claude Cowork project and select Live artifacts in the top-left area. Ask Claude to create a dashboard from the register or report you populated.
General prompt:
Create a dashboard of [REGISTER OR REPORT] as a live artifact.
For the Contract Register example, use:
Create a dashboard of the contract register as a live artifact.
Continue through the creation in Cowork. The live artifact produces an HTML dashboard and saves the file alongside the project files. The dashboard stays connected to the spreadsheet in the local project folder and can refresh when the register changes.
Test the update process by adding another record to the source worksheet in Excel and saving the workbook. Return to Cowork and select Update. The new record should appear in the dashboard after the refresh.
The same process can support other reporting views. A populated Cost Report can feed a cost dashboard, while a Risk Register can feed a risk view. The data and dashboard change, while the main workflow stays the same.
How Should You Review Claude's Outputs?
Check the source data, workbook rules, and dashboard before releasing the output. Anthropic also advises human review for final deliverables and audit-sensitive calculations in Claude for Excel.
- Compare every extracted value with the signed contract or approved source.
- Confirm dates, currency, units, tax treatment, and document revision.
- Test each formula with known values instead of accepting a plausible total.
- Keep missing information separate from any value inferred by Claude.
- Check that statuses follow the project's approval and reporting process.
- Use trusted spreadsheets and follow the project's data access rules.
- Store approved records in the formal project system when the process requires it.
A register may show a contract value correctly and still miss important details. Common gaps include tax, approved options, and provisional sums. Small omissions like that are what turn a useful draft into a risk.

The Full Claude Workflow for Construction Project Admin
Four Claude features handle the full workflow. The Project provides context, Cowork creates the templates, and Claude for Excel adds live project data. The live artifact then presents that data for reporting.
Once set up, the same workflow can add another contract and update the dashboard without starting again.
Can Claude Cowork Replace Construction Project Management Software?
Claude Cowork can support construction administration, but it should not hold the only formal project record. It works well for document review, workbook setup, data entry, and custom dashboard views.
Dedicated construction project management software has a different role. It manages shared approvals, user permissions, correspondence, and audit trails. These controls matter when several parties must rely on one accepted record of a decision.
Cowork also has a practical limit. Each Cowork Project remains on the computer where it was created. Anthropic’s current documentation says projects do not sync between devices or support team sharing.
Use Cowork to prepare and review working information. Once the information is checked and approved, record it in the project platform required by the contract or governance process.
Start Small With Claude Cowork
A small trial is the best way to assess Claude Cowork for construction admin. Start with one approved contract and one register. Check the workbook structure and verify every extracted value before building the dashboard. Once the process works, extend it to other contracts and registers.
For a broader look at how project teams are using AI, read Mastt’s State of AI in Construction Project Management 2026.
.avif)
Written by
Doug Vincent
Doug Vincent is the co-founder and CEO of Mastt, the AI capital-project management platform used by governments, Fortune 500 companies, and consultancies across APAC, North America, and MENA. Before founding Mastt in 2019, he spent a decade at RPS delivering more than $2 billion in capital works, including the $2.1B Defence Navy Infrastructure program, and holds a CPSPM certification with the AIPM. He contributes content and speaks on AI in capital project delivery at Mastt.


Contributions by
Jackson Row
Jackson Row is the Growth & North American Market Lead at Mastt. With a background in risk modeling, cost forecasting, and integrated project delivery, he helps capital project owners work smarter and faster. Jackson’s work supports better tools, better data, and better outcomes across the construction industry.

Contract Register Template
Use this FREE Contract Register Template to track, organize, and manage all your project contracts in one place. Stay on top of key dates, values, and obligations with clarity and confidence.

Walk Into Every Meeting With Confidence, Clarity, and Control
No one wants to look unprepared, blindsided, or uncertain in front of stakeholders — but that’s exactly what happens without Mastt.
Start for FreeTrusted by the bold, the brave, and the brilliant across governments, Fortune 500s, and the world’s best in delivering the future