
On most construction projects that use progress billing, the AIA G702 and G703 forms are non-negotiable. These documents form the industry standard for pay application. The G702 is the Application and Certificate for Payment, while the G703 is the supporting sheet.
Together, they help project managers, contractors, and project owners track what’s been completed, what’s billable, and what’s still outstanding. Understanding how to fill these forms out correctly can make the difference between getting paid on time or not at all.
What are AIA G702 and G703 Forms Used For?
The AIA G702 and AIA G703 forms are used to request payment for work completed on a construction project. The G702 is the summary form. The contractor fills it out to show how much work has been done, how much was billed before, and how much is being billed now.
The G703 is the continuation sheet that lists each portion of the work and how much has been completed for each line item. Together, these forms help project teams track progress, calculate retainage, and keep billing consistent with the contract.
The architect uses the G702 to certify the payment amount, based on the detailed breakdown in the G703. Most project owners require both forms to approve monthly draw requests.

When are G702 and G703 Forms Required?
G702 and G703 forms are required whenever a contractor submits a formal request for payment on a project using AIA billing. These forms are typically part of monthly draw requests and are used throughout the life of a project.
Contractors usually need to submit them when:
- Requesting a monthly progress billing
- Billing for an interim milestone
- Requesting payment after completing a defined project scope
- Submitting payment on projects using a schedule of values
- Billing for stored materials on-site or in bonded storage
Most owners and architects will not process or certify payments without a completed G702 and its matching G703. These forms help ensure the billing is accurate, detailed, and tied to real progress on-site.
Before You Start: What You Need to Complete G702 and G703 Forms
To complete the G702 and G703 forms accurately, you’ll need to gather key project and billing details in advance. These forms rely on up-to-date numbers from your contract, job progress, and payment history.
Here’s what you need to have ready before filling out G702 and G703 Forms:
- Original contract amount: The base contract sum before any change orders were added or deducted
- Approved change orders: Only include change orders that have been formally approved in writing
- Schedule of values: A line-by-line breakdown of the project scope with assigned dollar values; used to populate the G703
- Previous payment applications: You’ll need the last approved G702 to fill out Lines 7 and 8 for billing to date and current billing
- Retainage terms: Know the agreed retainage percentage (fixed or variable) and whether it applies to work completed, stored materials, or both
- Stored materials documentation: Invoices or proof that materials are on-site or in bonded storage, if billing for them
- Project team contact details: Names, titles, and addresses for the contractor, architect, owner, and any subcontractors involved
If you’re using digital tools, some of this data may auto-fill. But manual entry still requires accuracy. Missing or incorrect information is a common reason why payment applications get delayed or rejected.

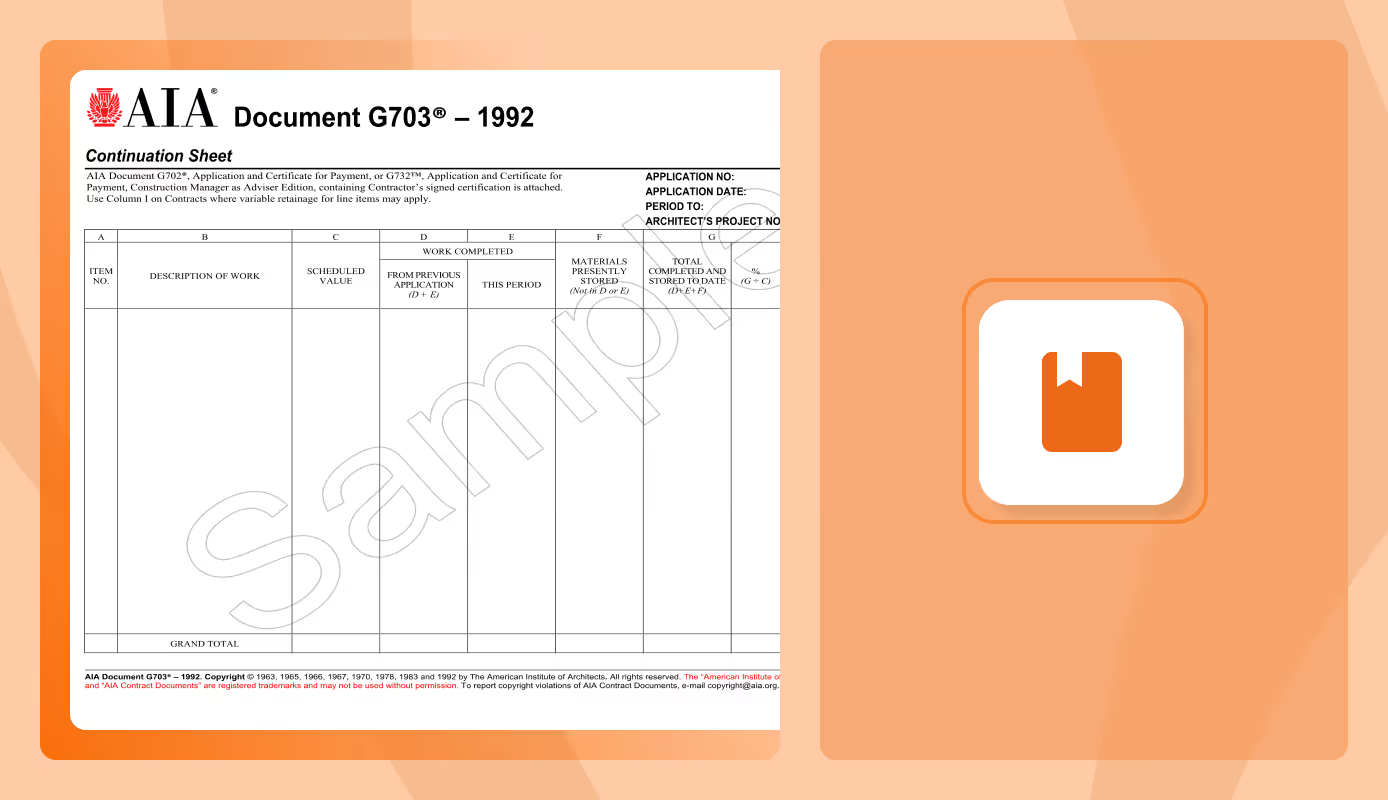
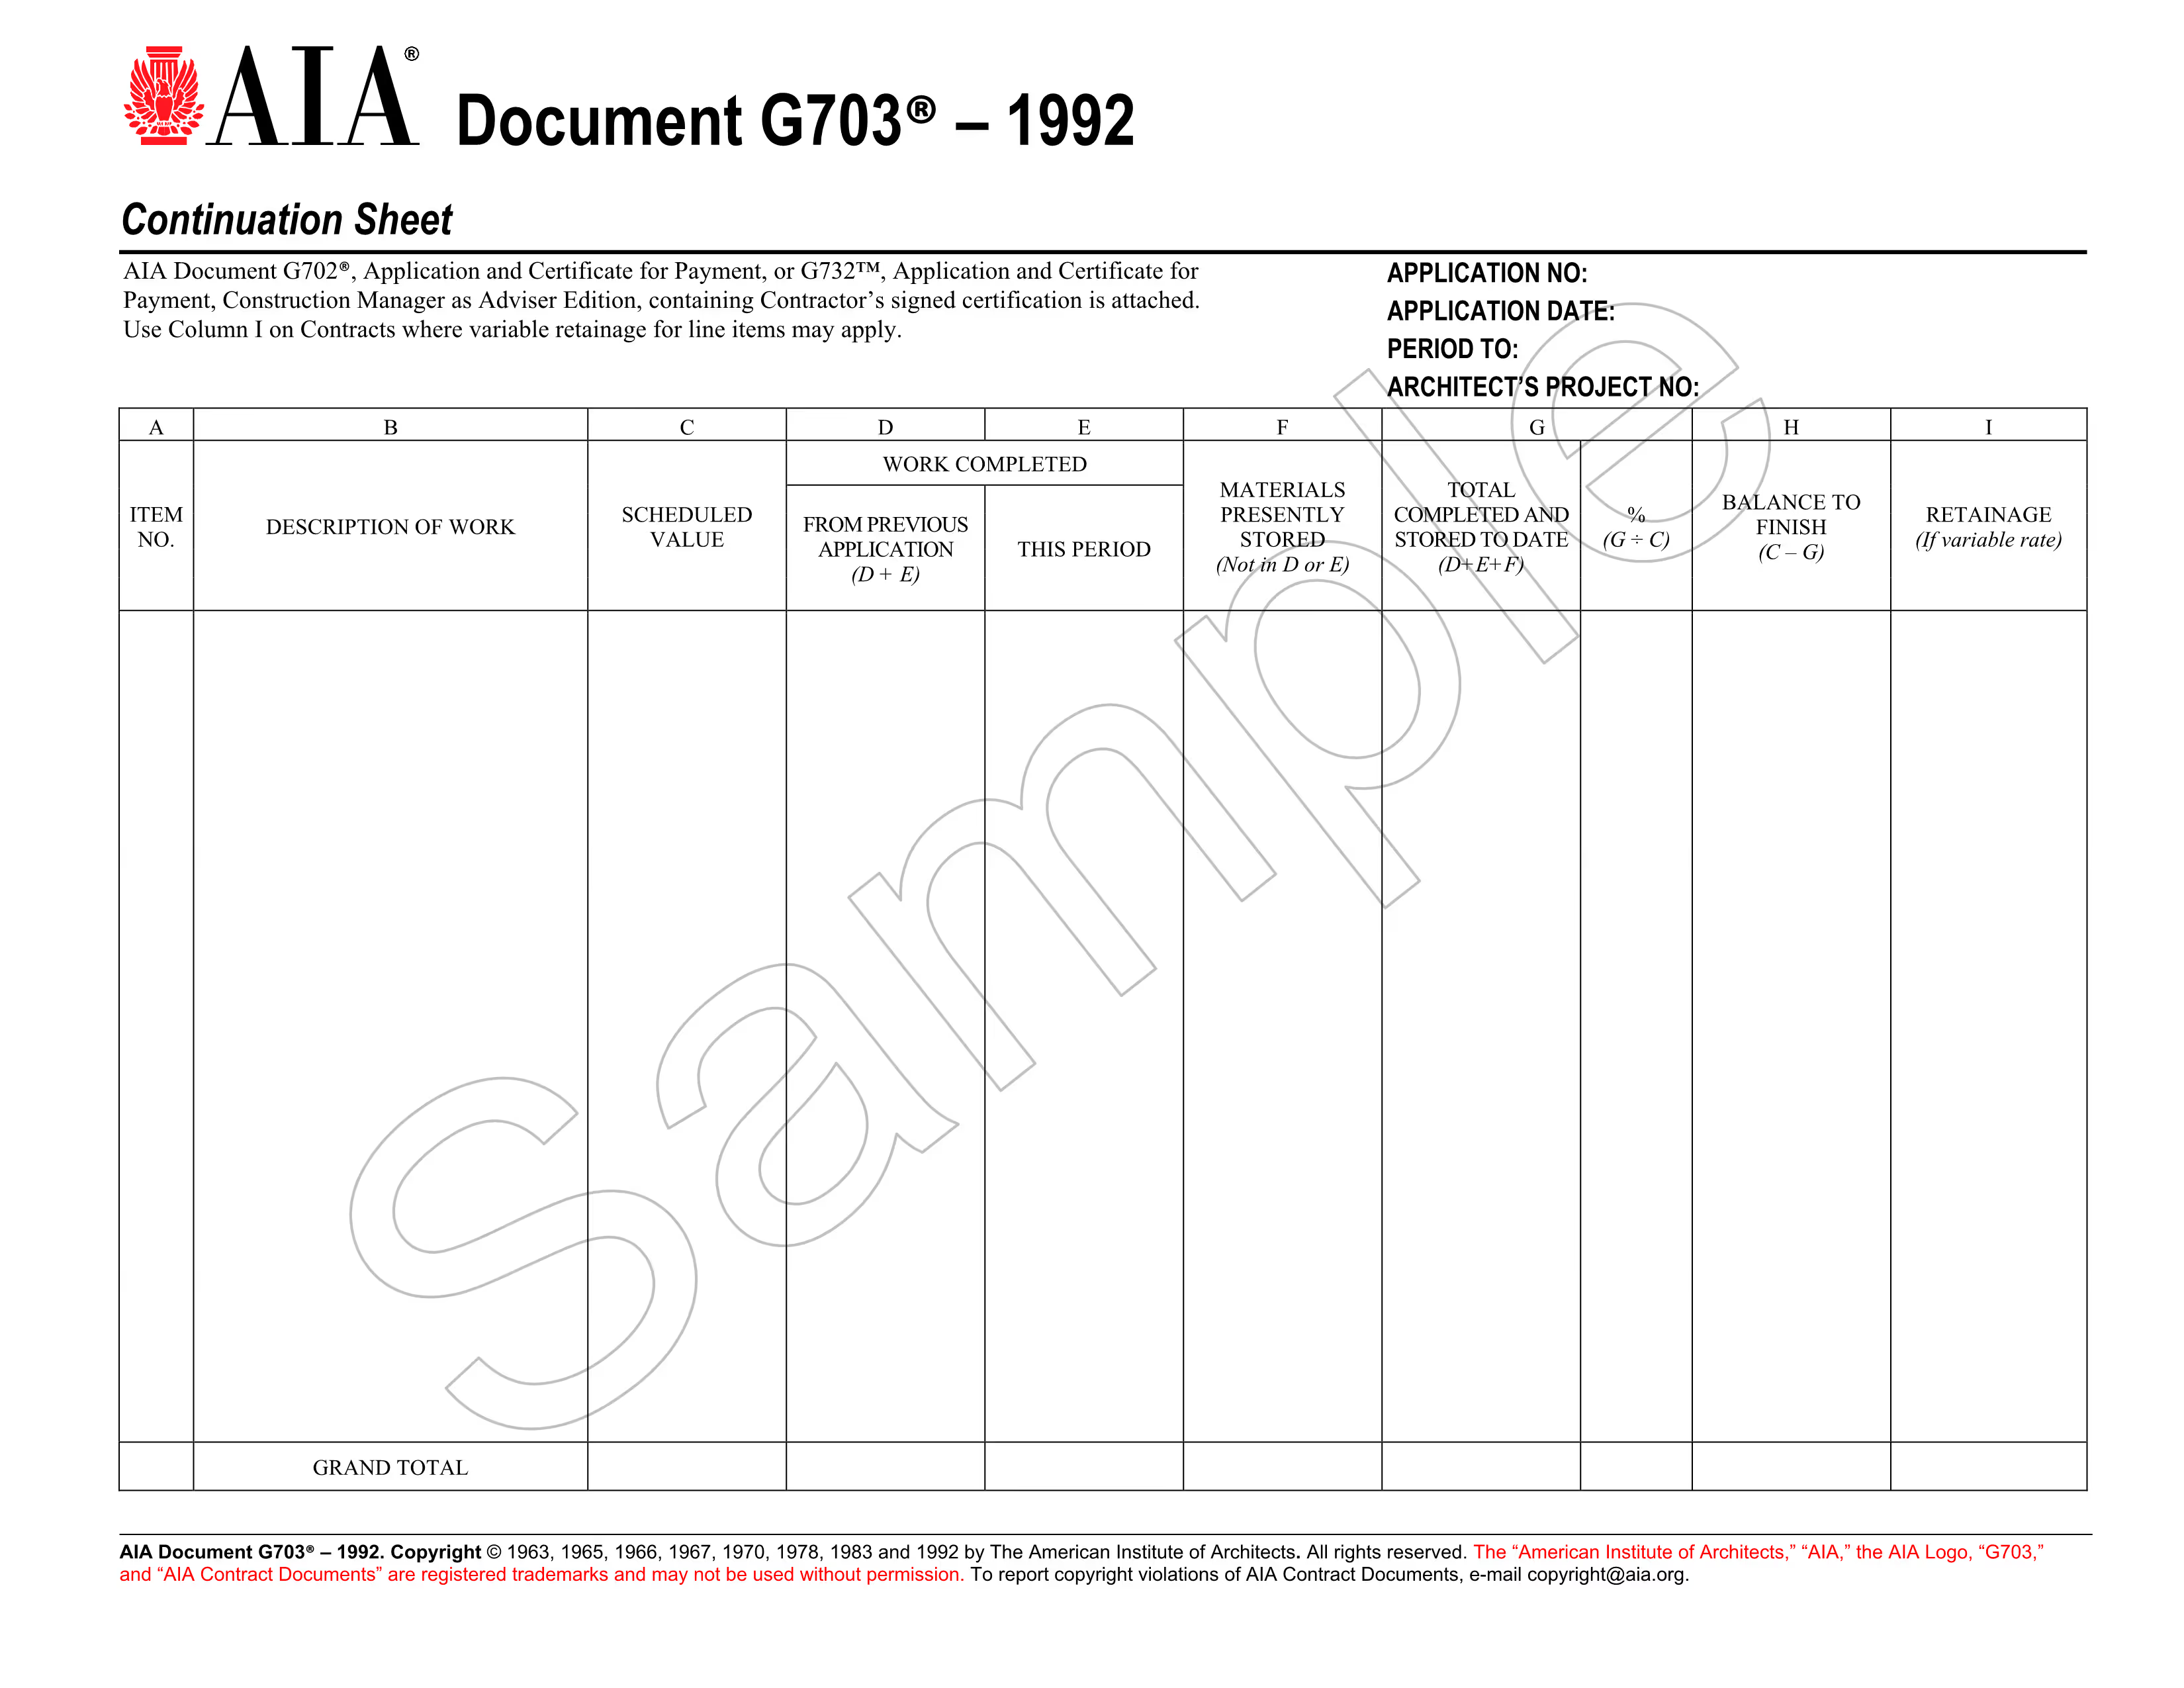
How to Complete the G703 Continuation Sheet
To complete the G703, break down the total contract value into line items based on your schedule of values. Each row should reflect a specific portion of work and track how much has been done, how much was done this period, and what’s still left.
Start with the G703 before filling out the G702. The totals from this form feed directly into the payment summary, including the amount earned to date and any stored materials. If the G703 is incorrect, your G702 will also be inaccurate.
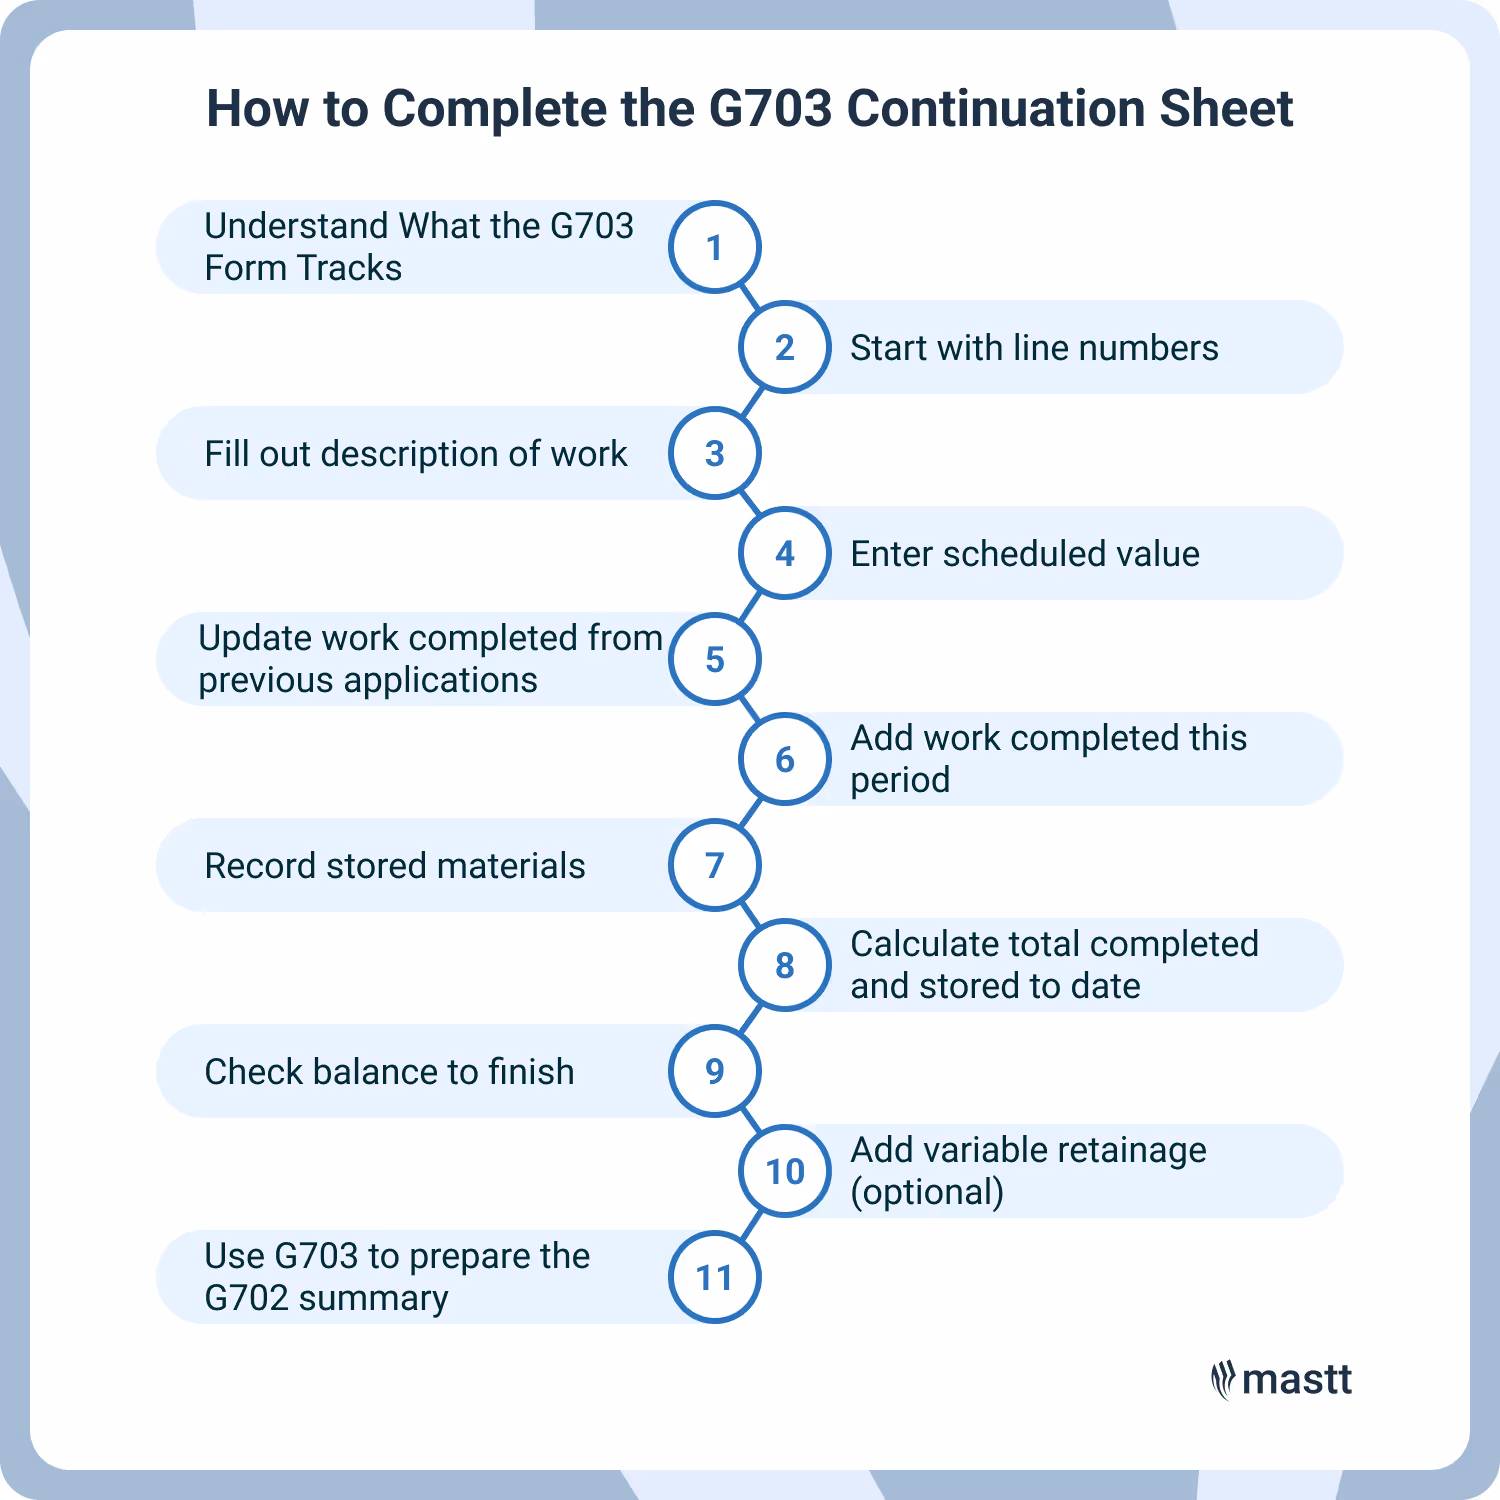
Step 1: Understand What the G703 Form Tracks
The G703 is the detailed backup to the G702 summary. It breaks your total contract value into individual line items based on your Schedule of Values. This lets the owner and architect see exactly what the contractor is billing for, by trade, phase, or cost code.
Each row shows:
- The description of work performed
- The scheduled dollar value of that work
- What’s been completed to date
- What’s newly completed this period
- What materials are stored
- Retainage (if applicable)
- What’s left to finish
Every number on this sheet flows into the summary totals on the G702. So if the G702 is the “cover sheet,” the G703 is your detailed receipt. It’s also how architects verify progress before certifying payment.
Step 2: Start with Column A (Line Numbers)
Column A is where you number each line item on the G703. These numbers help organize the different parts of the job you're billing for.
Most teams number rows in simple order, like 1, 2, 3, and so on. But some contracts or architects might want you to use spec section numbers, like 01000 for General Requirements or 09000 for Finishes.
Both methods are fine, as long as you're consistent. Use the same numbering system you used when you submitted your original schedule of values. Using the same numbering helps avoid confusion and keeps billing aligned with what was approved.
If you're using estimating or accounting software, it may already have a structure you can follow.
Step 3: Fill Out Column B (Description of Work)
Column B lists what each line item actually covers. This is where you briefly describe the work, trade, or scope tied to each cost.
Use short, accurate phrases. For example:
- Site Grading and Earthwork
- Concrete - Foundations and Slab
- Structural Steel Installation
- Framing - Level 2
- Plumbing Rough-In
- Electrical Panels and Wiring
The goal is to help the architect and owner understand what the contractor is billing for without guessing. If you have approved change orders, list them as separate line items. You can label them clearly, like “Change Order 002 – Added Concrete Footing.”
Stick with the descriptions from your original bid or estimate if possible. Changing terms mid-project can lead to questions or delays in payment. Keep it simple and consistent.
Step 4: Enter Column C (Scheduled Value)
Column C shows the total dollar value for each line item of work. This amount comes from your original Schedule of Values or the breakdown of the full contract sum across tasks, trades, or scopes of work.
These values should match what was approved at the start of the project. If you priced $50,000 for concrete slab work, that’s what goes in this column for that item. Don’t adjust the number unless there's a formal change order.
It’s important to get this right. Column C sets the foundation for how much you can bill across the life of the project.
If you understate a line, you might not be able to bill what you’re owed later. Overstating can raise red flags during reviews. Stick to the agreed values, and keep it clean and simple.
Step 5: Update Column D (Work Completed from Previous Applications)
Column D shows how much work you’ve already billed for on this line item in earlier payment applications. It includes:
- Previously completed work
- Previously stored materials that have since been installed
This column does not include any new work from the current billing period. That goes in Column E.
To fill it out, take the total amount billed for this line item up to your last application. If you're using software with integrated billing, the system may pull this number forward for you. If you're filling it manually, double-check your last approved G703.
Step 6: Add Column E (Work Completed This Period)
Column E shows the dollar value of new work completed during this billing cycle. This is the actual progress made on-site since your last payment application.
Only include work that’s been performed this period. Don’t add anything from previous cycles, and don’t repeat stored materials that were already counted before. You’ll usually base this number on:
- Site walkthroughs
- Progress reports
- Input from the construction superintendent or project manager
Here’s a quick example:
If “Roofing” is valued at $100,000 and you’ve finished 20% of it this month, you’ll enter $20,000 in Column E.
Never rely on guesswork or round numbers here. If the architect sees that every trade is conveniently “50% complete,” your pay app might raise eyebrows. Keep it real, and make sure field progress backs up your numbers.
Step 7: Record Column F (Stored Materials)
Column F is where you list the dollar value of materials you've purchased but haven't installed yet. These must be either:
- On the job site, or
- Stored in a secure, bonded facility
You’re allowed to bill for them, but only if the construction contract allows it and the owner or architect approves. Most will want proof, like delivery receipts, storage photos, or inventory logs.
Here’s what to include:
- Materials that have arrived but haven’t been used
- Equipment or fixtures stored on-site in a protected area
- Items in off-site storage with clear documentation and insurance
Don't double-count. If you already included those materials in Columns D or E, don’t list them again here. Once you install stored materials in the next billing cycle, their value moves from Column F into Column D or E.
Step 8: Calculate Column G (Total Completed & Stored to Date)
Column G gives you the total amount billed so far for each line item. It adds up:
- Column D (previously completed work)
- Column E (work completed this period)
- Column F (stored materials)
This is the number that flows directly into Line 4 of the G702. It shows the total value you've earned to date for each portion of the work.
In most digital tool integrations, Column G calculates automatically. If you're doing it manually, triple-check the math. Even a small error here can throw off your entire payment request.
Step 9: Check Column H (Balance to Finish)
Column H shows how much money is left to bill for each line item. It’s calculated by subtracting Column G (Total Completed & Stored to Date) from Column C (Scheduled Value).
So if the full value of a line item is $50,000 and you’ve completed $30,000 worth of work so far (Column G), then Column H would show $20,000 remaining.
This column helps everyone, especially owners and project managers, see what’s left in the contract. It’s also useful for forecasting cash flow, tracking progress, and planning future billing cycles.
Step 10: Use Column I Only for Variable Retainage
Column I is optional. You’ll only fill it out if your contract calls for variable retainage. This means the percentage withheld changes by line item or over time.
If your project uses a fixed retainage rate (like 10% across the board), you’ll handle that entirely in the G702 form. But if different trades or scopes have different rates, or if retainage drops at substantial completion, then Column I is where you show that detail.
In this column, enter either:
- The dollar value of retainage for each line item, or
- The retainage percentage, depending on what your contract asks for
Some project owners and architects insist on seeing line-by-line retainage values, even with fixed-price contracts. If that’s the case, your billing software may have settings to display these figures automatically.
Don’t enter anything in Column I unless your contract requires it. Unnecessary values here can cause confusion or worse, delays in getting paid.
Step 11: Use G703 to Prepare the G702 Summary
Once your G703 Continuation Sheet is complete and accurate, you’re ready to fill out the G702 form.
You’ll pull several key numbers directly from the G703:
- Column G total → Goes into Line 4 of the G702 (“Total Completed and Stored to Date”)
- Column I total (if used for variable retainage) → Feeds into Line 5 on the G702
- Change orders listed as line items → Rolled up into the Change Order Summary on the G702
This step bridges the detailed breakdown (G703) with the summary-level pay request (G702). If your G703 has mistakes, they’ll carry over. So, it’s critical to double-check values before moving on.
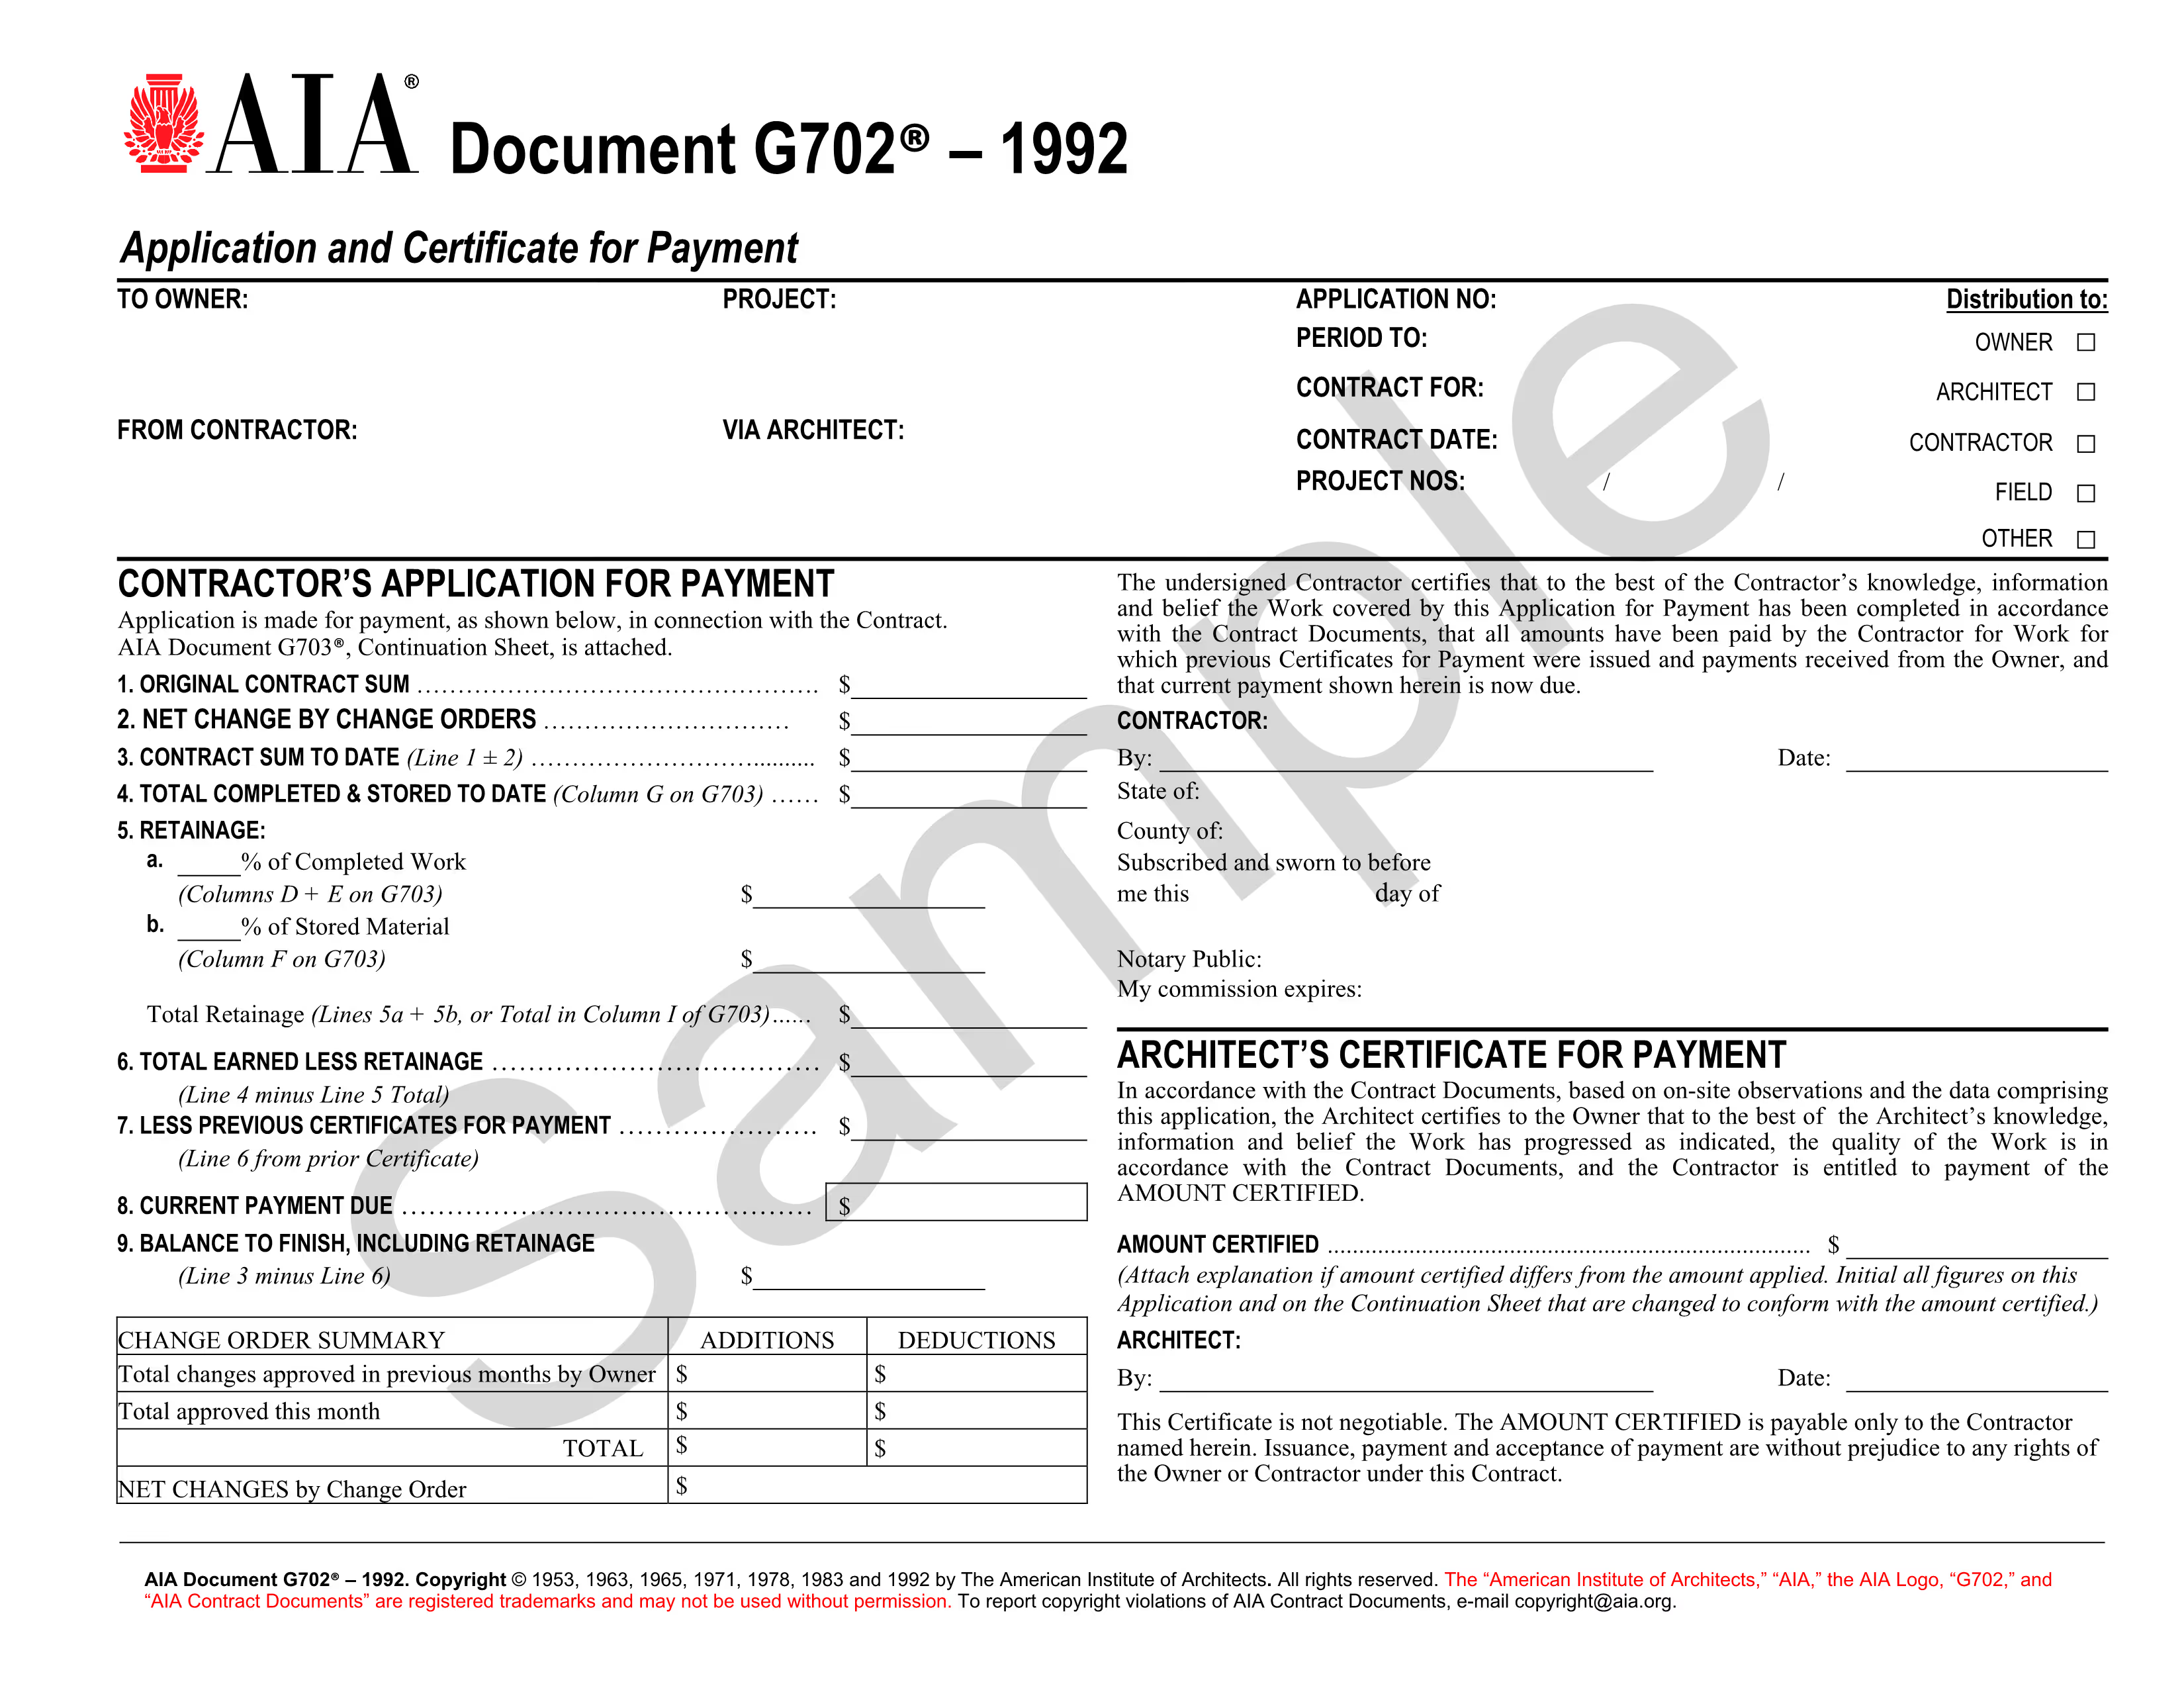
How to Complete the G702 Form (Application for Payment)
The G702 is the summary page of your payment application. It pulls in totals from the G703 and calculates how much has been earned, what’s already been billed, and what’s due now.
Each line of the G702 form builds on the one before it. You use it to show the owner and architect the project’s financial status down to the current dollar.
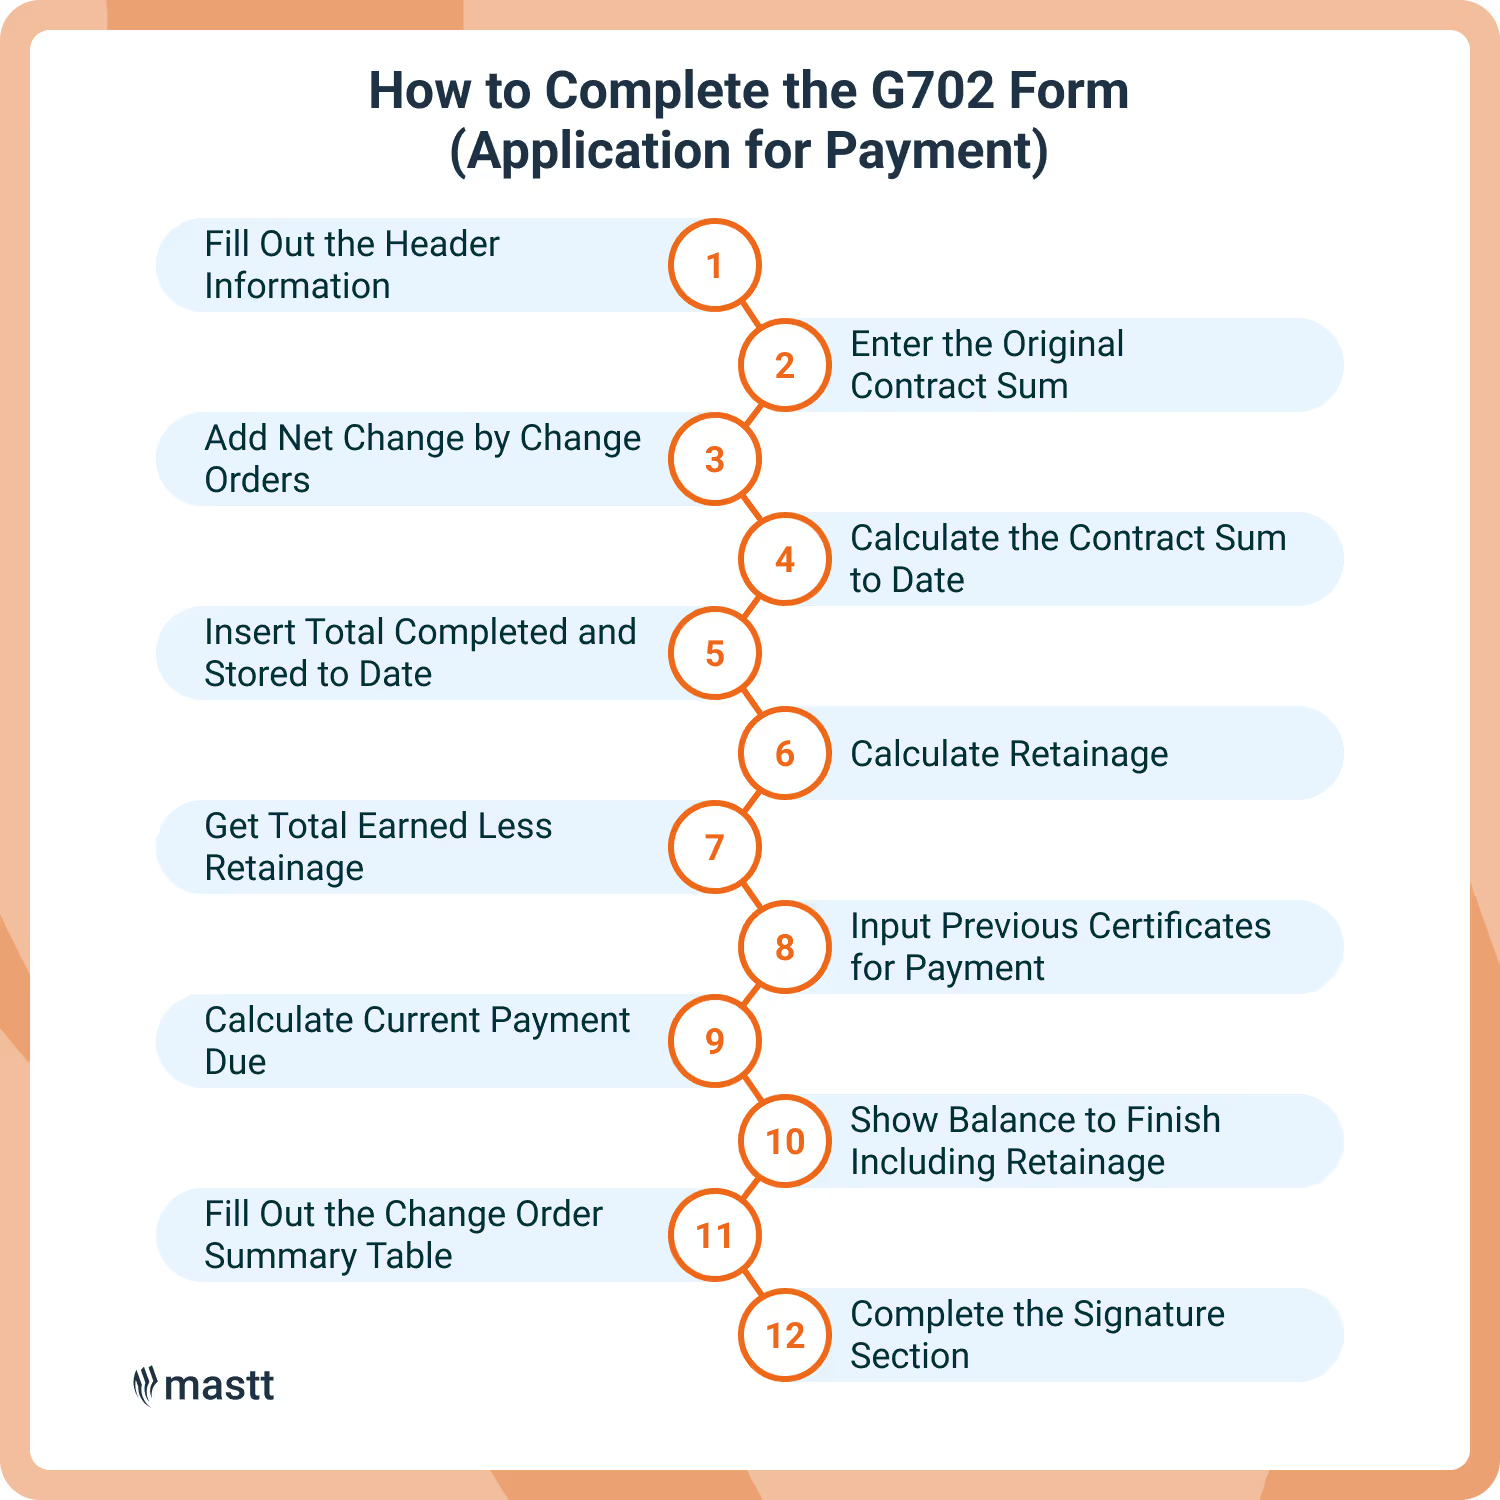
Step 1: Fill Out the Header Information
This section identifies the project, parties involved, and the billing period. It appears at the top of the G702 form and must be filled out completely and accurately.
- To Owner: Add the full name, address, and contact details of the project owner
- From Contractor: Enter your company name and address as listed in the contract
- Project: Include the name, location, and any job or project numbers tied to the job
- Via Architect: Add the architect’s name and contact info. This is who certifies the application
- Application No.: Start with “1” for your first billing cycle and count up from there
- Period To: This is the last day of the billing cycle. Usually set to month-end
- Contract Date: Match the original agreement date from your signed contract
- Distribution To: List who should receive a copy (e.g., owner, architect, GC)
- Contract For: Write a short description of the work or trade being billed
Make sure everything in the header matches your contract and the G703 continuation sheet. Any mismatched detail can delay approval.
Step 2: Enter the Original Contract Sum in Line 1
Line 1 shows the base contract value before any changes. It’s the amount agreed to at the start of the project and should match your signed contract.
Type in the full contract sum as it was originally awarded. Don’t include change orders, allowances, or extras. Those numbers get added in the next line.
For example, if your contract was signed for $850,000, that’s the number you enter here. It should stay the same across all applications unless there was an error in the first one.
Step 3: Add Net Change by Change Orders in Line 2
Line 2 captures the total dollar value of approved change orders. It includes both additions and deductions to the original contract.
Add up all formally approved change orders submitted up to this billing period. If you’ve had a mix of adds and deducts, calculate the net total. For example, if you added $20,000 in work and deducted $5,000, your net change is $15,000.
Only include change orders that have been signed off. Pending or disputed items should not be counted here. This line ties directly to the Change Order Summary at the bottom of the G702.
Step 4: Calculate the Contract Sum to Date in Line 3
Line 3 shows your updated contract value after factoring in approved changes.
Add Line 1 (Original Contract Sum) to Line 2 (Net Change by Change Orders). The total is your Contract Sum to Date. It reflects the full value of the work you’ve agreed to perform, including any changes that have been officially approved.
Keep this number up to date each billing cycle. It’s the foundation for the rest of the form.
Step 5: Insert Total Completed and Stored to Date in Line 4
Line 4 captures the total dollar value of the work completed and any approved stored materials so far.
To fill this out, pull the total from Column G of your G703 Continuation Sheet. That column adds up:
- Work completed in previous billing periods (Column D)
- Work completed this period (Column E)
- Materials currently stored on-site or in approved storage (Column F)
Once you total those three columns for all line items, the sum becomes your “Total Completed and Stored to Date.” Enter that value on Line 4 of the G702.
Double-check that this number accurately reflects real work done and approved stored materials. This figure directly affects how much you’re eligible to bill for. If it’s too high or missing documentation, your payment could be delayed or rejected.
Step 6: Calculate Retainage in Line 5
Line 5 shows how much money is being withheld as retainage. Retainage is a percentage of your earned amount that the owner holds back until later stages of the project - usually to make sure work gets finished properly.
There are three parts to Line 5:
- 5a or Retainage on Completed Work: Multiply the total value of completed work (from G703 Columns D + E) by the retainage rate in your contract (typically 10%).
- 5b or Retainage on Stored Materials: Multiply the value of approved stored materials (from G703 Column F) by the same rate
- 5c or Total Retainage: Add 5a and 5b together
If your contract uses variable retainage, where the rate changes by line item, skip 5a and 5b. Instead, pull the total retainage value directly from Column I of the G703 and enter it into 5c.
Step 7: Get Total Earned Less Retainage in Line 6
Line 6 shows how much you’ve earned up to this point, minus any retainage that’s being withheld.
To calculate it:
- Take the number from Line 4 (Total Completed and Stored to Date)
- Subtract the number from Line 5 (Total Retainage)
- The result goes on Line 6
This is the amount you’ve earned for all work completed and stored materials approved to date, after accounting for the retainage. It’s not what you’re asking to be paid right now, just the earned amount so far.
Step 8: Input Previous Certificates for Payment in Line 7
Line 7 tells the owner how much you’ve already billed on earlier applications.
To fill it out:
- Grab your last submitted G702 form
- Look at Line 6 on that form (Total Earned Less Retainage)
- Enter that exact number on Line 7 of your current form
This line has nothing to do with what you’ve been paid. Even if the owner hasn’t cut the check yet, you still enter the full earned amount from your last application.
Step 9: Calculate Current Payment Due in Line 8
Line 8 is the amount you’re asking to be paid for this billing period.
Here’s how to calculate it:
- Take Line 6 (Total Earned Less Retainage)
- Subtract Line 7 (Previous Certificates for Payment)
- The result goes on Line 8
This number reflects the value of the work and approved materials completed this period only. It’s your actual pay request for the current draw.
Owners and architects focus heavily on this line, so it must match the work shown on your G703. If Line 8 seems too high or low compared to actual site progress, expect questions.
Step 10: Show Balance to Finish Including Retainage in Line 9
Line 9 tells the owner how much is left to pay you after this billing cycle, including any remaining retainage.
To calculate it:
- Take Line 3 (Contract Sum to Date)
- Subtract Line 6 (Total Earned Less Retainage)
- Enter the result on Line 9
Line 9 gives a clear picture of the unpaid balance left on the job. It includes both the remaining work and any retainage being held until later.
Keep in mind: this number assumes all previous payment applications were accepted in full and that no disputes or partial payments exist.
If your previous applications weren’t paid in full, this line might not reflect your actual outstanding receivable. But, it’s still what the form requires.
Step 11: Fill Out the Change Order Summary Table
The summary table tracks how the original contract value has changed through approved change orders.
You’ll need to list the number and dollar value of all additions and deductions in the contract. These values should be broken down into two groups: those approved in previous billing periods and those approved in this billing cycle.
Once you total the additions and deductions, you’ll calculate the net change. That amount should match what you entered earlier on Line 2 of the G702.
If the amount doesn’t match, you’ve likely missed something, or included a change order that hasn’t been formally approved yet. Only include change orders that have been signed off by the owner or architect.
Step 12: Complete the Signature Section
At the bottom of the G702, you’ll need to sign and date the form before submitting it. This confirms that the information you’ve provided is accurate and complete.
The contractor’s signature is always required. Some contracts also require this form to be notarized, especially on public projects or where legally mandated. Double-check your contract to see if notarization applies.
Whether you’re submitting on paper or digitally, make sure signatures are clear and complete. Incomplete or missing signatures can delay approval and payment.

What Happens After Submitting the G702 and G703 Forms?
Once you submit the G702 and G703 forms, they go through a formal review process before payment is approved. Most delays happen here, so it’s important to know what to expect:
- Architect Review: The architect checks your forms for accuracy. They compare the G703 breakdown with project progress and verify totals, retainage, and change orders.
- Certification: If everything looks correct, the architect signs the G702 to certify the payment amount. They can also adjust it if they disagree and note the reason.
- Owner Review: The certified forms go to the owner or finance team. They review again, confirm budget availability, and process payment.
- Payment Timelines: Payment is usually released based on contract terms, often 30 days from approval. Government projects or large corporations may take longer.
- Rejected Forms: If the forms are incomplete, have math errors, or list unapproved change orders, they’re returned for revision. This resets the review timeline.
- Tracking Drafts vs. Finals: In digital systems, you may need to submit a draft first. Once approved, you’ll submit a final, signed version. Keep both versions clearly labeled to avoid confusion.
Staying on top of these steps helps you avoid delays and maintain good standing with the project team.
Tips to Avoid Common Mistakes When Filling Out G702 and G703 Forms
G702 and G703 forms get rejected often due to small, preventable mistakes. Most issues come down to incorrect math, mismatched totals, or confusing what's been earned with what's been paid.
Here’s how to avoid the most common slip-ups:
- Don’t confuse “earned” with “paid”: Line 7 on the G702 should reflect what you’ve billed previously, not what you’ve actually been paid.
- Use only approved change orders: Never list pending or unsigned change orders. Only include those that are formally approved.
- Avoid negative numbers: For deductions, use the “decrease” option in the change order summary. Don’t type in negative signs because some reviewers reject forms because of this.
- Don’t double-count stored materials: Materials listed in Column F of the G703 should not also appear as completed work in Columns D or E.
- Keep your scheduled values consistent: Once you’ve submitted your initial schedule of values, stick with it throughout the project unless there’s an approved change.
- Leave subtotal lines blank past Column C: If you use subtotal rows in your G703, fill out only the scheduled value. Leave the rest of the row empty to avoid math errors.
- Double-check math on every line: Review column totals, retainage, and any calculated fields. Small mistakes can cause big headaches.
- Make sure header info matches across forms: Project names, application dates, and billing periods should be identical between the G702 and G703.
- Watch retainage inputs: If you're using fixed retainage, don't fill in Column I on the G703. If you're using variable retainage, make sure the percentages match your contract.
Taking a few extra minutes to check your forms before submission can save weeks of back-and-forth.

Where to Get Fillable AIA G702 and G703 Forms
The G702 and G703 forms are copyrighted by the American Institute of Architects (AIA). That means you can’t legally copy, recreate, or edit the original format unless you purchase it directly from an authorized source.
You can buy official, fillable AIA G702 and G703 forms from:
- The AIA website
- Authorized AIA document distributors
If you're looking for an AIA G702, G703 fillable form, the AIA offers editable PDFs that let you enter data directly. These are certified and accepted by most owners, architects, and consultants.
If you come across offers for an AIA G702 and G703 free download, be careful. These downloads are usually templates meant for training, not legally valid forms. Free versions might help you practice or create internal drafts, but you’ll still need to purchase the official documents for submission.
Some construction software can print your billing data onto pre-purchased AIA originals. But they don’t generate official forms by themselves. Always double-check that your final output matches AIA formatting if you’re using software to populate the forms.
Final Thoughts: Why G702 and G703 Accuracy Matters
In construction, payment depends on clear documentation, not just completed work. That’s what G702 and G703 forms are really about. These forms are part of your payment pipeline.
When filled out correctly, G702 and G703 forms keep your cash flow steady and build trust with owners and architects. But small mistakes can delay payments and create bigger problems.

Written by
Anna Marie Goco
Anna is a seasoned Senior Content Writer at Mastt, specialising in project management and the construction industry. She leverages her in-depth knowledge to create valuable content that helps professionals in these fields. Through her writing, she contributes to the company's mission of empowering project managers and construction professionals with practical insights and solutions.


Contributions by

Continuation Sheet
Free Pay Application Continuation Sheet Template! Plus, an overview of AIA G703 Application for Payment's Continuation Sheet and Payapps in Construction generally for context and background.

Walk Into Every Meeting With Confidence, Clarity, and Control
No one wants to look unprepared, blindsided, or uncertain in front of stakeholders — but that’s exactly what happens without Mastt.
Start for FreeTrusted by the bold, the brave, and the brilliant across governments, Fortune 500s, and the world’s best in delivering the future